Unfortunately, cats, just like people, are susceptible to various diseases. And their owners often have to deal with the fact that the animal needs intravenous infusion of medications. In this article you will learn how to put an IV on a cat at home.
This procedure is not as simple as an injection in the withers, but if you correctly follow the algorithm of actions given below and do not worry, then everything will go smoothly and the IV will be placed correctly. The recommendations given in this article are also relevant when giving intravenous injections to dogs.
© shutterstock
Indications for IV drips in cats
The absolute indication for administering an IV to a pet is a diagnosis by a veterinarian. Self-medication and diagnosis of the disease at home should not be done under any circumstances, because it is extremely difficult to diagnose the disease correctly without sufficient experience. However, you need to know the key symptoms in order to correctly describe the pet’s condition to the doctor if, due to the distance from the nearest clinic, the owner is unable to show the animal.
So, the most common cases for placing an IV are:
- acute poisoning;
- renal failure;
- dehydration after prolonged diarrhea or vomiting;
- the need to recover from anesthesia after surgery.
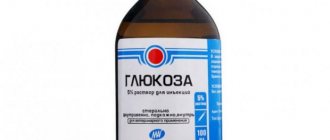
As a rule, saline solution (average daily dose - 20–30 ml per 1 kg of animal weight) or Ringer-Locke solution is administered using a dropper, and 5% glucose is also administered, however, this drug is prohibited for use in animals with diabetes, and head injuries or seizures, use with caution.
Preparation
The process of placing an IV in a cat is quite simple and painless if done correctly . Therefore, the main point here is to get rid of your own fear. The animal will easily feel your excitement, and the procedure will be significantly delayed.
Owners who are encountering a dropper device for the first time need to study it thoroughly before using it. This makes it easier to avoid risks and find solutions in unforeseen situations.
Methods for administering fluids to your pet
There are the following methods of administering fluid using a dropper (or system):
- subcutaneously;
- intravenously.
For one-time instillation of drugs, systems are placed directly into a vein, and for regular instillation, through a catheter. Let's look at each method of administering liquids.
Subcutaneously
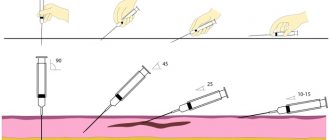
An injection into the subcutaneous tissue is considered the most painless compared to the others, but this does not mean that the cat will not resist the intervention. Before the procedure begins, the animal is placed on its stomach so that the withers are as free as possible. In the space between the shoulder blades and the base of the neck, the fur is pinched together with the skin and pulled up. The needle is inserted into the triangle formed in front of the fingers. For convenience, the pinch is made not across, but along the cat, so that there is more free space for inserting the needle. In this case, the syringe must be located at an angle of 90 or 45 degrees to the surface of the skin. To ensure this requirement, an empty syringe is sometimes placed under the IV needle, which lifts the tube at the desired angle.
In the case of a one-time injection, the procedure can be carried out in the groin fold. The dropper is connected only to a needle placed at the withers.
When performing subcutaneous injections, swelling forms at the injection site; this is a normal reaction of the body to the procedure; there is no need to stop the infusion.
To treat my cat, I gave him subcutaneous injections. The cat reacted rather restlessly, but due to the fact that subcutaneous injections can be administered quickly, he tolerated the procedure in the most dignified manner. The injection was performed at the withers, because the cat was lying down and even with all my desire, I would not have been able to gain access to the inguinal fold. I didn’t find anything difficult in the process other than mental anguish. However, a dropper still differs from a simple injection.
My friends had a cat who was sterilized quite late in life, and she suffered from complications. For treatment, doctors prescribed a drip, the drug was administered subcutaneously. The procedure was carried out in the clinic, but in the presence of the animal owner. Doctors installed the system in the treatment room, and then left the owner alone with the animal to wait for the medication to be administered. When inserting a dropper subcutaneously into the withers, the needle can be secured with a band-aid, however, due to the wool, it is not held securely, so the owner must hold the tube with his hand. Fortunately, my friend’s cat had a calm temperament and did not fidget in her hands, plus a sick animal is by default more lethargic and pliable in response to the will of the owner. Closer to the middle of the drip, the cat, as a rule, fell asleep, but periodically still tried to roll over and had to be calmed down.
To administer the fluid subcutaneously, the skin at the withers is pulled back and an injection is made into the resulting triangle.
Intravenously
When administering intravenous fluids, the drip is placed directly or into a catheter.
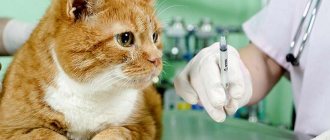
A one-time intravenous injection in veterinary clinics is performed using a syringe.
Introduction via catheter
A catheter is a medical instrument, a tube with a needle at the end, inserted into the channels and cavities of the body and providing constant access to the bloodstream. It has central and top ports (valves). The central one is used for long-term administration of drugs, and the upper port may be needed to add a drug during the process of administering a drip or administering a heparin solution to prevent the formation of a blood clot.
The color of the top port cap allows catheters to be differentiated by size
A catheter is placed in an animal only by a veterinarian. Installation of a catheter at home is carried out only in exceptional cases due to the complexity of the procedure and the risk of infection. The maximum period for which the tool is installed is 5 days. Thanks to this, administering fluid through a catheter is less traumatic compared to injections into a vein. After all, if this tool is installed, there is no need to constantly subject your pet to painful procedures (injections). The animal will be able to move around with the catheter in its paw, although the instrument may cause minor inconvenience to your pet. Throughout the entire period that the catheter is in the vein, you need to take care of the installation site, not allowing the cat to remove the fixing patch, and also check the paw for swelling and leakage, increased temperature at the installation site and other abnormal symptoms.
Caring for an installed catheter:
- daily checking for contamination and removing it;
- cleaning the external parts of the catheter with alcohol during the day;
- it is necessary to work with the catheter only with clean hands;
- change the catheter fixing patch without using scissors;
- Disinfect or replace the middle port plug (cover) after each use.
Introduction directly
Installation of a dropper directly without the use of a catheter is carried out when a veterinarian prescribes a one-time infusion or to provide emergency care to an animal. The procedure requires competent preparation in the form of an initial consultation with a veterinarian, and then independent study of video materials. Installing a dropper directly, in the same way as in the case of a catheter, allows you to introduce another drug during instillation without removing the system.
A dropper without a catheter is placed if it is necessary to provide emergency assistance to an animal or for a one-time infusion
Rules
It may sound trivial, but your hands should be clean! If you had to give an injection in unsuitable conditions, use gloves or at least a new plastic bag. A few rules about syringes:
- Injections are made with freshly unpacked syringes.
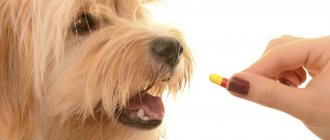
- The needle must be sterile (it should not be touched with hands) and new. After the first injection of the drug, microscopic burrs appear on the needle, which interfere with repeated injection, that is, 1 injection = 1 new needle. If you need to give injections from one syringe, but several times, purchase syringes with spare needles (their caps are of different colors, so as not to get confused).
Never leave the drug in the ampoule for administration after some time. If you purchased an expensive medicine, draw it into several syringes at once and store it in the refrigerator. Some drugs cannot be stored for more than 10–12 hours after opening the ampoule; in this case, the option of storing in a syringe is also not relevant.
Injectable drugs, which are sold in powder form, are diluted with saline, novocaine or lidocaine. In this case, read the instructions carefully, since after dilution, the shelf life of the drug is very limited.
Be careful, anyone, including you, can make a mistake. I may sell you the wrong drug by mistake, you yourself may confuse the ampoules, or one of your family members, trying to help, may mislead you. Before injecting the drug from the ampoule, read the name. If the expiration date or the name of the drug has been erased from the ampoule, do not use it.
If you are proceeding without your veterinarian's instructions, never mix multiple medications in one syringe. There is a high probability of oxidation of one of them or precipitation. In both cases, the injection will be useless.
The instructions for each drug contain a description of what the liquid or powder should look like. If the description does not match what you see, do not use the drug. There are a number of drugs that are stored only within certain temperature limits. Such medications should only be purchased from trusted pharmacies or from the veterinarian himself.
Even if the drug is prescribed by a doctor and you are given exact instructions, check:
- Is it possible to administer the drug to a pet? Some dog medications are toxic to cats.
- Is it possible to administer the drug subcutaneously? This information is in the instructions.
- What temperature should the drug be when administered? Some solutions need to be heated to 40° or administered cool.
- Are there any warnings in the instructions regarding the speed and method of administration; some drugs need to be administered very slowly or diluted.
- How long should you shake the bottle before withdrawing the drug into the syringe? Sometimes this needs to be done for several minutes or until the drug becomes completely homogeneous.
Modern manufacturers of injectable drugs package medications in ampoules with indicator circles or stripes. Logically, you need to press the ampoule away from you above the indicator and the neck will break off. In fact, you can “fight” with some ampoules for hours or even crush them. If the ampoule does not give in, a special stone is used to file the glass. Be careful, you can seriously cut yourself on the neck and broken part of the ampoule.
The necks of ampoules can be of different diameters. For convenience, a small ampoule (neck up to 2 mm) can be turned upside down and take the drug, don’t worry, it won’t spill out. The drug will flow through a neck of 3 mm or more, so it must be taken by placing the ampoule on a vertical surface.
Dial up the drug 0.5–1 division more than you need to inject. Then lift the syringe up with the needle and tap the syringe with your finger
Please note that you need to knock on the plastic, on the syringe itself, but not on the needle (it cannot be touched). Air bubbles will rise to the nozzle of the syringe
Tilt the syringe so that the bubbles are under the nozzle and press the plunger to expel the air.
With a subcutaneous injection, you need to get rid of the air in the syringe as much as possible, but one small bubble will not cause any problems.
Installing an IV for a cat
The basic rule for installing an IV, as with any other medical intervention, is thoughtfulness and sterility.
To fulfill the first rule, determine in advance the location of the procedure: a table with a bedding must be prepared in the room on which you will fix the pet; you need good lighting and an object such as a mop or cabinet handle, located at a height of 40–50 centimeters from the table, to secure the solution . In addition, it is necessary to ensure the optimal temperature of the solution. If for some reason there is no time to warm it up, after collecting the dropper, provide a deep plate with hot water through which the system tube will pass, then the drug will warm up a little before infusion. During the entire administration process, it is necessary to keep the cat under supervision, it is necessary to select the desired speed of administration of the solution and to prevent air from entering the dropper tube.
To maintain sterility, you need to wash your hands with soap and water up to the middle of the elbow, put on disposable gloves and invite an assistant to help.
Remain calm during the procedure: the owner’s feelings are transmitted to the cat.
Preparation for the procedure
To install a dropper you will need:
- medicinal product;
- tripod for fixing the bottle. Can be replaced with a pendant made from a plastic bag or bandage;
- disposable syringe;
- system for intravenous infusions (infusions);
- alcohol and cotton wool.
When all the components are collected, you can proceed directly to the procedure:
- Remove the protective cap from the lid of the medicine bottle.
- Turn it over and fix it at a height of 40–50 centimeters above the intended location of the patient.
- Treat the rubber stopper on the bottle cap with alcohol.
The intravenous infusion system consists of a needle for connection to a bottle or plastic bag with solution, a dropper, an injection rate regulator, a unit for additional injections and a needle
- Assemble the system: Lower the injection speed control wheel all the way down.
- Insert the punch into the rubber stopper on the lid of the medication bottle.
- Nearby, insert a needle from a disposable syringe or for intravenous injections, which comes with the system if the liquid will be administered through a catheter. This is necessary for air circulation.
- Press the plastic container under the punch 2-3 times. Liquid should drip from the bottle. Wait until the container is half full.
- Slowly lift the dispenser ring (speed control wheel), watching as the liquid fills the tube. The goal is to prevent air from entering.
- Follow the entire path of the liquid through the tube until it begins to pour out.
- Close the dispenser and check the system for air bubbles.
- If there are bubbles, open the dispenser again and drain the solution until they are destroyed.
- Insert the free end of the dropper into the needle that is already in the cap of the bottle. The dropper can be left in this form until the procedure begins.
Further actions depend on whether a catheter will be used to administer the medicine or not.
Video: how to assemble a dropper
Inserting an IV using a catheter
To connect an IV to a catheter in an animal's vein, follow these steps:
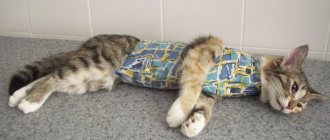
- With the help of an assistant, place the animal on the table, calm it down, secure it by wrapping it with pre-prepared bedding.
- Clean the outer parts of the catheter with cotton wool soaked in alcohol.
- Fill the syringe with 2 ml of saline solution.
- Remove the protective cap from the middle port of the catheter.
- Insert a syringe without a needle into it and inject the solution. A small amount of solution should remain in the syringe to prevent air bubbles from entering the vein. Further actions depend on how well the solution flows: If the usual force when pressing the syringe plunger is not enough, then a blood clot has formed in the catheter. Try to dissolve it by introducing a mixture of heparin and saline into the upper port in a ratio of 0.1 ml of the former to 1 ml of the latter. Repeat the injection of the solution through the middle port. If everything is still the same, then it is best to contact your veterinarian to replace the catheter.
- If the solution goes well, you can continue the procedure.
Video: how to connect the system to a catheter
Installing an IV without using a catheter
To install an IV without using a catheter, follow these steps:
- With the help of an assistant, place the animal on the table, calm it down, secure it by wrapping it with pre-prepared bedding.
- Shave the fur on the paw at the fold and slightly below.
- Wrap the paw tightly above the fold with a tourniquet or bandage. Wait for the vein to swell.
- Insert an intravenous needle parallel to the paw. Better than the butterfly type.
The butterfly uses a very thin needle, which will reduce the likelihood of injury to the vein
- Remove the clamp or bandage. If everything is done correctly, blood will begin to drip from the end of the needle.
- Open the dropper with the wheel and watch the speed at which drops appear in the plastic container. It should be 1-2 drops per second, depending on the density of the solution; the higher it is, the slower the liquid needs to drip.
- Secure the needle with an adhesive tape at a distance of a centimeter from the injection site.
- If you need to add another drug, fill the syringe with it and inject the medicine into the elastic band (node for additional injections).
Completing the procedure
When the liquid begins to flow through the system tube or the required amount remains in the bottle, close the dropper with the wheel and perform the following steps:
- with a catheter installed, remove the system from it. Close the middle port of the catheter with a clean stopper, and drop a mixture of heparin and saline into the top port (drawn into a syringe at the rate of 5 ml of 0.5 ml of heparin per 4.5 ml of saline) to prevent the formation of blood clots. Bandage the catheter and secure the bandage with a bandage;
- if there is no catheter, peel off the plaster securing the tube with the needle, apply a cotton swab soaked in alcohol to the puncture site and remove the needle. Bandage or secure the area with a bandage.
Features of the solution
The drug contains chloride, which maintains the acid-base balance and takes part in the synthesis of hydrochloric acid, which stimulates the processing of proteins. Sodium regulates fluid levels and metabolism.
© shutterstock
Sodium chloride with glucose 5% in medicine belongs to the group of isotonic solutions, because its pressure corresponds to the osmotic pressure of blood plasma. Salt is a component of plasma and other fluids in the body. The drug removes toxins and does not irritate tissues. It is a colorless transparent solution with a salty aftertaste. Packaged in glass bottles of different capacities, from 100 to 500 ml.
Possible problems and complications
The most common problem when installing an IV is fluid obstruction. The main reasons may be:
- with venous placement - pinching of the pet's paw. The problem is solved by massage and relaxation of the limb;
- when installed through a catheter - blood clot formation. The problem is solved by flushing the catheter with saline solution or a mixture of saline solution and heparin (drawn into a syringe at the rate of 5 ml of 0.5 ml of heparin per 4.5 ml of saline solution);
- lack of air vent in the medicine bottle. The problem is solved by inserting a syringe needle into the stopper.
After an IV drip, you can observe the following symptoms in your cat:
- normal: apathy, lethargy;
- accumulation of fluid under the puncture site during subcutaneous injection;
- vomiting (one meal);
- the cat peed itself;
- refusal to eat;
- refusal to drink;
If abnormal symptoms occur, stop the drip and contact your veterinarian.
A properly administered drip can help cure your cat or alleviate the symptoms of the disease, so there is no need to refuse to carry out the procedure prescribed by your veterinarian at home.
Procedure
The first thing to do before the procedure is to thoroughly wash and disinfect your hands so as not to accidentally introduce an infection into your pet’s body.
The second step is to prepare the site for placing the IV in the cat. The limb must be made perfectly clean, and the area around the intended puncture must be shaved and degreased with alcohol.
ATTENTION! The animal must be securely fixed in a position convenient for it so that the solution flows evenly and without problems.
Diet
First of all, you need a balanced diet with a minimum content of protein and phosphorus, which will have to be followed very precisely - the slightest deviation will lead to a deterioration in the animal’s condition
Therefore, it is important to know exactly how and what to feed a cat with kidney failure. It is quite difficult to create a correct diet on your own; most likely, you will have to transfer a sick cat to specialized and expensive food
Dry food is contraindicated.
It will be especially difficult to accustom a cat to a new type of food - it will require a lot of patience and time, but it will help prolong the pet’s life. In addition, you may need drugs that stimulate appetite and regulate digestive processes.