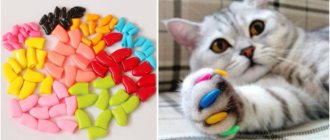
Anti-scratch guards for cats are designed to protect surrounding objects and household members from the sharp claws of a pet. Popular silicone pads come in 4 sizes and can be used on kittens from 4 months of age (size XS for babies). To fix them, a special glue is used, which is included in the kit and does not cause allergies.
The service life of the covers is 1-1.5 months. It is not allowed to be worn for up to 4 months, if you are allergic to glue and for animals that walk outside, if there is a fungus or infection on the claws. On average, for a set of 40 nozzles you will have to pay up to 400 rubles.
An alternative to anti-scratch treatments can be a repeller spray (Beaphar Stop-it Cat, Biovax, Anti-scratch) and training the cat to use a scratching post.
Ways to get rid of cat claws
Pet stores offer special pheromones and anti-scratch sprays. This remedy is not always effective, since the cat continues to sharpen its claws on sofas and armchairs, in addition to the carefully prepared scratching post.
A more effective, but downright cruel way to save property is onychectomy. This is an operation to remove a cat's claw with part of a finger, leading to disruption of the musculoskeletal system, pain, coordination problems, arthritis and other diseases. After it, the animal’s uniform load on the body’s muscles is disrupted, some of them experience overload, and others begin to atrophy.
The cat becomes disabled, increasingly uses its teeth and ceases to maintain hygiene in the tray due to the inability of its sore paws to turn over the litter. Often such animals end up on the street and die there.
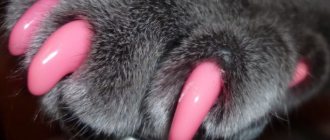
As an alternative to surgical intervention, anti-scratchers for cats have been invented - soft claws, which are designed to stop the cutting off of cat's toes. This is a real salvation for an animal's health - an individual cover for each claw, made of multi-colored plastic, rubber or silicone.
The most popular homemade scratching posts (manufacturing instructions)
Any owner can make a scratching post for their pet themselves. First you need to choose the desired type of product and stock up on the appropriate materials.
Corrugated cardboard scratching post
This type is the most economical and environmentally friendly; its production does not require much time.
Materials needed: corrugated cardboard or cardboard boxes, thick paper, adhesive tape or PVA glue, knife.
One of the bloggers, Andrey Deveykin, made a scratching post in this form. Thanks to him for providing the photographs.
Manufacturing:
- lay out cardboard boxes, draw strips about 10-15 cm wide on them;
- cut out the resulting strips and start rolling them. The very first strip is the base of the structure. It needs to be rolled up as tightly as possible and secured with PVA or adhesive tape;
- gradually increase the volume by gluing strips and fixing them with tape or PVA;
- the last strip must be secured especially carefully so that it holds the entire structure and does not allow it to fall apart after the cat’s first attempt to sharpen its claws;
- The resulting scratching post must be placed on thick paper, circled around the edges and cut along the line. Glue the resulting paper figure to the bottom of the structure.
Corner scratching post
To make a corner model, you will need boards the width of a door frame. A thick fabric is attached over the boards or a thick rope made of natural materials is wound. When the product is ready, it is fastened on both sides of the outer corner.
Here is an example of step-by-step manufacturing of a corner scratching post:
- Take a board 200 mm wide and 1.2 meters long.
- Saw it in half.
- The result is two identical boards that need to be connected using dowels. It is better not to use self-tapping screws (since the cat, when sharpening its claws, may get into their cap). By the way, we must remember to process the cut edges so that our cat does not harm himself.
- Connect two pieces and make marks every 8 cm; there will be dowels in these places.
- We take dowels with a diameter of 6 mm and a length of 30 mm. Accordingly, in one of the workpieces you need to drill holes 15 mm deep (with a 6 mm drill) from the end in the marked places.
- You need to hammer the dowels into the resulting holes to equal lengths; you can use a square for this.
- In another workpiece, holes must be drilled from the front side.
- Next, fasten the workpieces using glue and wait until it dries.
- For upholstery, you can use carpet, first dividing it into two equal parts.
- You can secure the carpet using a stapler on the inside of the scratching post. The remaining part needs to be covered with glue and glued to the boards. And also attach the second end of the carpet using a stapler.
- You can attach the scratching post to the wall using the corners (bottom and top). You need to drill holes in the wall where the corners are attached, and then hang the scratching post using self-tapping screws.
- Afterwards, do not forget to check that the scratching post is holding well by hanging the cat on it).
Wall-mounted scratching post
The principle of its manufacture is the same as the corner version, but for the work one takes one wide board and attaches it to the wall so that the cat can easily reach it by standing up to its full height. It is important that the cat has free access to the scratching post. It is better not to place it in the bathroom or hallway. You need to determine where your pet spends the most time and place the device there.
Scratching post-post
For work you will need: a beam approximately 70 cm long and at least 5 cm wide, a round or square support made of wood about 4 cm thick.
Instructions for assembling the scratching post:
- On the support of the future claw handle, draw one line in the middle and a second line perpendicular to it, connecting them in the center. At the intersection point we will later attach the stand. We place the prepared beam in the middle of the support, then we outline its boundaries for further placement of self-tapping screws or self-tapping screws.
- We connect the support to the beam using glue and fasten them with self-tapping screws.
- We either leave the block in its original form or cover it with fabric, cutting out a piece with a width equal to the diameter of the stand, adding a couple of centimeters for the seams.
- We tightly wrap a thick rope over the fabric, tying it in a tight knot at the bottom of the block. By the way, the rope can be painted in several places, then the scratching post will look much more beautiful. The rope can be put on glue if it does not hold well.
Floor scratching post
This model is convenient because it does not take up much space in the apartment, it can be rearranged and taken with you on the road. The most simple version of a floor scratching post is an ordinary board covered with carpet. You can also wrap a thick twine around the base.
When making such a nail polisher, the main condition is the weight and stability of the device so that it does not drag on the floor when the cat decides to sharpen its claws.
By the way, here you can read an article about how to make a house for a cat with your own hands.
Why are anti-scratch pads needed?
The functional purpose of this invention is quite broad; claws have a huge number of advantages:
- Protects furniture from being torn apart.
- They keep the animal healthy and look aesthetically pleasing.
- Protect cat owners in case of health problems. With anti-scratch protection, the cat will no longer be able to cause a wound and cause infection.
- They will protect children and adults from a playful kitten.
- They will save your pet from showing jealousy towards another family member or animal.
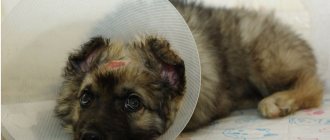
- Will stop attempts to scratch or tear off stitches after surgery.
- They will provide accommodation in a clean and tidy apartment, as the cat can use the litter box without any problems.
- Bathing a pet becomes a less dangerous activity for the owner.
Option #3. Scratching post made from plumbing pipe and rope
In this master class you will see how quickly and easily you can make a scratching post using a regular sewer pipe and rope. It seems like a lot of work, but in reality creating such a nail sharpener will take little time.
Step 1 . Take a plastic pipe, which is used for sewerage, with a diameter of 7 cm and saw off the socket from it using a regular hacksaw.
The socket is cut from the pipe
Step 2 . The length of the pipe blank should be 70 cm. If the pipe is too long, cut off the excess.
The pipe must be 70 cm long
Step 3 . Take 4 ordinary furniture corners. and, attaching them to the pipe, make marks on it in accordance with the fastening holes on the corners. Drill holes with a suitable drill bit.
Holes are drilled in the pipe
Step 4 . Attach the furniture corners to the pipe using bolts and nuts. Be sure to tighten them well to keep the connections strong.
Furniture corners attached
Step 5 . Take a sheet of plywood or chipboard and cut a piece of it measuring 50x55 cm.
Cut chipboard sheet
Step 6 . Turn the piece of plywood over and mark the middle.
The center of the workpiece is marked
Step 7 . Place the pipe so that the center of its hole and the center of the plywood sheet coincide. Mark the places that coincide with the holes in the furniture corners.
Marking holes in furniture corners
Step 8 . Drill holes in the plywood using a drill and then screw the base to the pipe. The pipe will be held in a vertical position thanks to the corners that securely hold it.
The pipe is screwed to the base
Step 9 . Now take a piece of carpet and mark the middle. The piece should be approximately 60x65 cm in size.
The middle of a piece of carpet is marked
Step 10 . Next, cut a round hole in the middle area with the same diameter as the pipe. It is most convenient to cut with a stationery knife.
The hole is cut with a stationery knife
Step 11 . Insert the pipe into the hole in the carpet so that the pile of the carpet faces up.
The pipe is threaded into the hole
Step 12 . Glue the carpet to the wooden base.
The carpet is glued to the base
Step 13 . Treat the lower and upper parts of the pipe with sandpaper and degreaser approximately 10-15 cm up and down.
Sanding the pipe
Step 14 . Prepare two pieces of carpet about 10-15 cm high and a length equal to the circumference of the pipe. Wrap them around the pipe at the top and bottom, and glue them in place using a glue gun.
A piece of carpet is glued
Step 15 . Cut a circle from the carpet with a diameter equal to the diameter of the pipe.
A circle is cut out of the carpet
Step 16 . Glue the carpet circle as a plug onto the top of the pipe. You can glue with a glue gun.
The circle is glued as a plug
Step 17 . Let's go back to the base. In the area of the corners, so that the carpet bends well, cut off the excess, as shown in the figure.
Excess carpet is cut off
Step 18 . Fold the edges of the carpet and secure them with a stapler.
Curved edges are fixed with a stapler
Step 19 . The base is completely ready. Now take a jute rope with a diameter of 12 mm. Such a scratching post will require about 18 m. Next, using a glue gun to fix the rope at the very beginning, wrap it around the pipe, starting from the bottom border of the carpet.
Jute wrapped around a pipe
Step 20 . Wrap the pipe completely with rope. At the top, secure the edge of the rope with a glue gun. To be sure, you can glue a few turns in the middle.
Several turns can be glued
Step 21 . The scratching post is ready. Using the same principle, you can make a claw sharpener not from a pipe, but from a thick block. An example can be seen in the video below.
Do-it-yourself finished scratching post from a pipe
Articles on the topic
DIY dog bed
Video - Scratching post made from pipe and rope
Video - Rope and wood scratching post
When not to use anti-scratch products
Veterinarians have mixed opinions about wearing nail guards. Firstly, putting caps on is stressful for your pet. Secondly, the opportunity to satisfy the natural need to grind off the claws is lost. Anti-scratch products are not recommended when:
- the cat walks on the street, because in case of danger, it will not be able to climb onto a hill or protect itself;
- the kitten is less than 6 months old;
- the cat, due to old age, no longer scratches either people or furniture;
- The animal has an allergic reaction to the glue.
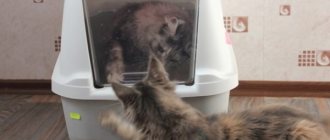
How to train a cat to use a scratching post
As soon as a cat scratching post appears in the house, you need to attract the animal’s attention to the new thing. You can hang a toy on it on a string, a bow or a ball so that your pet notices.
When the cat approaches the scratcher, you need to praise it and stroke it so that the animal understands that the owner approves of its actions. You can carefully pick up your pet’s paw, place the pads on the surface of the scratching post and move it down so that the cat understands the principle of using the item.
If your pet has forgotten about the scratching post and is spoiling other things, there is no need to offend the animal or shout at it, you just need to calmly take it to the scratching post so that the cat understands that you can’t sharpen its claws there, but you can sharpen it here.
In some cases, you can resort to using a few drops of valerian on the surface of the device, then the pet will definitely not pass by.
Trying to wean a cat from sharpening its claws is impractical and unjustified, because... the animal will do this in any case out of natural necessity. You can either make a scratching post with your own hands, or purchase a ready-made one at a pet store.
Also read how to stop a cat from tearing up furniture and more.
Myths about claw pads
Manufacturers claim that silicone tips are completely safe for the animal, even if it swallows them. In rare cases, an allergy to the glue may occur, but it is not toxic. In Russia, there are myths about anti-scratch kits among cat owners:
- The claws itch under the caps. The assumption itself is absurd, since the claws do not have nerve endings, otherwise it would be impossible to trim or sharpen them painlessly.
- Nail guards prevent the claws from retracting. This is not true, given that the anti-scratch pads are glued to the tip sticking out of the pillow. If the cap is placed very deeply on the claw, the cat may experience discomfort, but if everything is done correctly, the pet’s movements will not be constrained.
- The gait changes. To some extent, this statement is a fact, since at first the animal gets used to the innovation and experiences stiffness in its movements. After an adaptation period, the cat begins to move confidently and calmly again.
- The glue and material used to make the attachments are toxic. Manufacturers completely refute this statement; a cat can easily chew and swallow the cap, it will come out naturally without harm to health.
How to put on your cat's nails
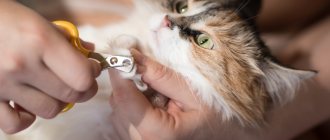
You should put false nails on your cat after the claws have been trimmed. If separation of the stratum corneum is observed, then it is necessary to trim the surface with a file.
How to properly glue a cat's nails
The following instructions will help you glue your cat’s nails correctly:
- prepare 5 silicone caps from the package;
- apply a small amount of glue into the cavity of the nozzle (no more than 1/3 of the volume);
- disinfect the claws on the cat’s paw with an antiseptic;
- Having pressed on the crumb, extend the claw and place the cap on it, gently pressing it on all sides;
- similarly glue attachments to all the pet’s claws;
- when the anti-scratch for the cat is glued, the animal should be held so that the glue sets, and after 10-15 minutes the cat with false nails can be released;
- Glue from the owner's fingers can be removed with nail polish remover.
If the pet is mischievous and breaks out, then you can attract an assistant and wrap the cat in a blanket for the procedure.
Anti-scratch for cats: instructions on how to use
There are no special instructions for using anti-scratch pads for cats; the animal simply wears them until they either rip them off or they fall off along with the renewal of the nail. If your pet chews and eats the cover, it’s okay. It will come out naturally without damaging the walls of the stomach and intestines.
Anti-scratch glue
Glue is included with the cases. A non-toxic product is used to attach silicone tips. In rare cases, the glue used to attach false nails can cause an allergy in your cat.
How to remove anti-scratch pads from a cat's claws
You can remove scratch guards from your cat’s claws when the stratum corneum of the claw grows back. In this case, the nozzle disappears on its own. This happens after about 1-2 months, depending on the intensity of the natural processes of claw regrowth in the cat.
If you need to remove them a little earlier, then you need to carefully trim the tip of the cover and pull it off.
Disadvantages of anti-scratch pads
In addition to myths, you can hear unpleasant reviews about silicone caps:
- The pet's movement around the apartment becomes noisy. To solve this problem, nail guards can be glued only to the front paws.
- Slow getting used to the “manicure”. The adaptation period is individual for each animal, but if the anti-scratch pads are applied correctly, the cat should not experience discomfort for a long time.
- Rapid wear of the caps. On average, the attachments last for a month, but some cats manage to remove them much earlier. In this case, it is recommended to have spare ones.
- Nails prevent the cat from performing hygiene procedures: cleaning its ears and teeth. This concern falls entirely on the shoulders of the owner.
Anti-scratch alternative
An alternative to anti-scratching can be a cat repellent spray, training the animal to use a scratching post, or special socks.
Anti-scratch spray
Anti-scratch sprays contain repellent substances, such as essential oils, which furry creatures do not like. The most popular repeller sprays among owners are Beaphar Stop-it Cat, Biovax, Antiscratch (True Friend) and Antiscratch pheromones for cats.
Scratchy
A scratching post or scratching post is a device for grinding down claws in apartment living conditions. You can purchase a horizontal or vertical modification at a pet store. Most often, jute rope, sisal, and corrugated cardboard are used for its production. Some pets will like a wooden scratching post.
Getting used to using the device will not be difficult if you buy a finished product specially impregnated with aromatic agents.
How to use the pads
The most correct decision when putting on anti-scratch pads for the first time would be to consult a veterinarian. He will tell you about all the nuances and show how to put the caps on correctly without compromising the health of the pet and the owner.
The sizes of the nozzles are selected based on the size of the cat:
- up to 6 months, pads are contraindicated;
- XS – for kittens and cats weighing from 0.5 to 2.5 kg;
- S – animal from 2 to 4 kg;
- M – cat from 4 to 6 kg;
- L – pet from 6 kg or more.
Trying on anti-scratches is carried out immediately before gluing them. If the owner made a mistake with the size, you can trim the caps a little or buy others that are suitable in size.
The nozzle should fit tightly around the claw, not slip off, and the distance to the base of the claw is at least 3-5 mm.
How to choose the size of anti-scratch pads
If a person decides to get anti-scratch protection for his cat, then he needs to know how to determine the size.
Since cats are different, the size of the silicone tips is important: the same products are not suitable for the claws of a Maine Coon and a Foreign White. The age of the animal is also important.
For kittens weighing 0.5-2 kg, size S is suitable. For cats with a body weight of 2-4 kg, size M is provided. Larger cats, whose weight ranges from 4-6 kg, will fit size L.
Giants, whose breeds are included in the list of the largest cat breeds, will be in size XL.
In addition to sizes, claw covers come in different colors.
Operating procedure
First of all, you need to take the cat on your lap, pet it, and let it relax. If she breaks free and runs away, in preparation for the gluing process, you need to give her the opportunity to calm down and unobtrusively massage her paws.
Steps to put on anti-scratch boots:
- without touching the parts where the blood vessel and nerve pass, you need to trim the part of the claw that bends downwards with a hook by 1 mm;
- disinfect with any antiseptic;
- Fill the cap one third with glue, so that the excess does not stick the wool together when it subsequently flows out;
- press on the pet’s paw pad so that it releases its claws, put on the pad with glue, stepping back 2 mm from the skin, hold for a few seconds for better fixation;
- hold the cat in your arms until the glue dries completely.
If the cat cannot get used to the pads or they are glued incorrectly, the caps must be removed. If the animal behaves calmly, sooner or later they will disappear on their own.
How to glue correctly
The gluing process should not bring any inconvenience or stressful situations to the animal. Step-by-step gluing of anti-scratch protection:
- The animal must be prepared: feed it, sit it in your arms, talk calmly, pet it.
There should be no extraneous sounds in the room that distract or irritate the animal.
- You need to take the cat's paw, press lightly so that claws appear (this process is similar to the procedure with circumcision).
- Before gluing the anti-scratch pads, measure the claws to ensure they fit perfectly.
- A little glue is poured into the pad, after spreading, glue it onto the claw, press down a little.
The animal is not immediately released. We must wait until all the tips have completely hardened.
To extend the life of the pads, you can trim the claws by 1–2 mm, no more.
We recommend videos on the topic:
Mr. Cat recommends: the opinion of veterinarians
Veterinarians believe that the procedure of putting on anti-scratch guards can cause stress for up to several weeks even in a calm animal. With attachments, the cat cannot fully wash itself, does not feel the surface on which it moves, all this causes discomfort. Doctors advise:
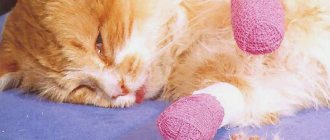
- Attach the caps only to healthy paws. If there are injuries, irritation, fungal or infectious lesions, the animal must first be treated.
- When the anti-scratch pads are already glued, you need to regularly inspect the paws for fungus or infection.
- Apply the pads carefully to prevent glue from getting on the skin, since as the claw grows, painful cracks may form on the skin, which are favorable for the development of infection.
- If an allergy to glue manifests itself in the form of irritation or swelling, you must immediately contact a veterinarian and remove the anti-scratch protectors.
Option #2. DIY carpet scratching post
In the next master class we will get acquainted with another simple variation of the scratching post. This time the author used a rug. This is a denser material than cardboard, and such a scratching post can already be made for an adult cat.
Step 1 . First of all, prepare the base. This can be a piece of board or several bars connected to each other, as in the photo. We recommend taking a solid board - it’s easier and faster.
It will take several bars
Step 2 . If you decide to use bars, then connect them together with long self-tapping screws in several places.
The bars are connected with self-tapping screws
Step 3 . After this, take thin foam rubber, attach a piece of wood to it and measure out a piece of foam rubber the same width as the future scratching post. Cut it off.
You need to measure a piece of foam rubber
Cutting foam
Step 4 . Next, take a small rug or a piece of old carpet, the remnants of carpet after repair.
Next we take the carpet
Step 5 . Place a piece of wood on the underside of the rug first, then a piece of foam rubber.
Foam rubber is laid on top of the wooden blank
Step 6 . Simply wrap the board with foam rubber into the mat, trying to wrap it very tightly.
A board with foam rubber is wrapped in a mat
Step 7 . Secure the mat with self-tapping screws in several places so that it does not unfold. It is important to take short self-tapping screws so that their ends do not come out through the wood.
The mat is fixed with self-tapping screws
The scratching post is created and ready to be fixed on the wall. Additionally, you can add several laces to its upper part, which will attract the cat's attention.
A wall-mounted scratching post can be made not only from carpet, but also from rope. We offer an example of such a product in the video below.
Video - A simple wall-mounted scratching post made of cord on a wooden base
Rating of claw covers and price comparison
Anti-scratch products are sold as a set of attachments of different sizes, glue and instructions for use. The cost of a set of 20 pieces averages from 230 to 400 rubles, depending on the manufacturer and the store where it is sold.
When choosing, you must take into account that low cost may be an indicator of low quality of the product. Cheap glue can cause an allergic reaction or poisoning.
You can purchase the set either in pet stores or order it on websites: aliexpress, ozone and the like.
The most popular in descending order:
| Name | Amount in a package | Colors | price, rub. |
| Anti-scratch “NEW” | 40 | 11 | 375 |
| Cliny “Soft Claws” | 40 | 6 | 285 |
| "Crazy Liberty" | 20 | 6 | 249 |
How to remove anti-scratch pads from a cat's claws
The duration of wearing stickers is on average 1.5-2 months. The pet owner does not have to remove them at all, since as the nail grows they fall off on their own. During wear, the cornea of the claw is renewed, and the cap falls off along with the old top layer. Quite often, animals chew off the pads themselves when caring for their paws.
Properly worn anti-scratch guards
Anti-scratch treatments for pets are a humane alternative to surgical declawing. This method has many advantages, the main thing is to learn how to choose the right pads and use them.
*Prices are current as of March 2021.
When overlays are needed
Anti-scratch caps (second name) are oblong caps made of soft plastic or silicone. They follow the shape of the claw and are “settled” on top using special medical glue. It is hypoallergenic and suitable for most cats without causing any discomfort.
Although not all owners and veterinarians support the idea of wearing such attachments, there are several reasons when it is still worth purchasing them and teaching your pet to walk in them.
- Small children. Kids love to play with cats, cuddle, pull by the tail, pinch and show love in other “non-standard” ways. Not all animals are able to tolerate bullying and react calmly to it. Some may use their claws as a defense and inadvertently injure the child's skin. In such cases, anti-scratches will be one hundred percent justified.
- Protection of household items. Not only sofa upholstery, wallpaper and door frames, but also curtains, carpets, children's toys, and clothes often suffer from tenacious cat claws. To protect interior and wardrobe items from damage (often irreversible), you will have to use overlays.
- Character traits. It happens that cats cannot be re-educated or show aggression towards their owners, guests, children, etc. They can rush at imaginary offenders, scratch themselves, break free from their hands - behave nervously and inappropriately. Or hurt other domestic animals present on their territory. The use of caps will reduce the risk of injury and slightly pacify the cat's temper.
- Household safety. Here we are talking about possible harm to health. The claws contain microbes, and if there are deep scratches, they can enter the wound, causing inflammation. In the worst case, blood poisoning. People who have weak immunity, poor blood clotting, or a predisposition to various allergic reactions should beware of damage.
Disadvantages of overlays
They claim that the latter do not cause cats any inconvenience: supposedly, whiskered cats with anti-scratch protection just as easily jump, run and conquer peaks.
In fact, with pads, all the cat’s usual actions and reflexes are greatly complicated: without sharp claws, the pet cannot climb high surfaces and slow down when turning during games. It is not surprising that cats with “soft claws” are more likely to fall (including from heights) and get injured.
For such an animal, basic hygiene procedures are difficult: it is inconvenient for him to itch, clean his ears and wash himself.
The claw, supplemented with a protective case (even the softest one), does not retract into the paw, which means the cat is forced to walk with its toes spread out.
Important! Odd foot positioning changes a cat's gait, causing discomfort and sometimes pain. In addition, any jump down can result in a fracture of the protruding fingers.
Another danger of protective caps is the glue used to fix them: it can provoke severe allergies. In addition, cats with “soft claws” are more susceptible to a variety of dermatitis, which develops due to sweat and oil that gets trapped under the caps and decomposes there.
And the last unpleasant property of nail pads is that, depending on their material, they creak, knock or click when the cat is actively moving (walking on the floor, rummaging in the tray or playing). Not every person can tolerate such sounds without internal tension.
Option number 4. How to make a scratching post house
And we left the hardest part for last. Here is a master class on how to create a scratching post-house. Whether or not the cat will use it is unknown. But you will spend much less money on creating such a house than buying a ready-made one in a store. However, be prepared to set aside a few hours of your free time. The speed of manufacturing such a product directly depends on whether you have the appropriate skills.
Step 1 . First of all, let's deal with the base. Plywood or chipboard is suitable for it. Using a jigsaw, cut out a fairly large rectangle with rounded edges.
The corners of the workpiece need to be rounded
Step 2 . Next, cut out a partial circle from the same material using a jigsaw. You will need 2 pieces of such parts.
An incomplete circle is cut out
Incomplete circle is ready
Step 3 . Now you will need a sheet of fiberboard. Attach your partial circle to it, circle it and cut out the resulting part. You need 2 of these parts.
There is an incomplete circle circled on the fiberboard
Step 4 . Next, attach one fiberboard semicircle to the plywood semicircle.
Fiberboard blank glued to plywood
Step 5 . In the second semicircle, cut a hole the same shape as the semicircle.
A hole is cut in the second incomplete circle
Step 6 . Take a rectangular base, install and fix both semicircles on one side, as shown in the figure (do not screw it in with self-tapping screws yet). Between them, make a jumper from a block.
A timber lintel is installed
Step 7 . Next, take the resulting structure and cover it with padding polyester, and then with finishing fabric. It is convenient to fix the material with a stapler.
The structure is covered with padding polyester
Fixing the finishing fabric
Step 8 . Take a piece of trim fabric and place it right side down on the round piece. Next, secure the material with a stapler. Place padding polyester on top of it.
The fabric is fixed with a stapler
Step 9 . After this, cover the house with plywood, fixing the material well on the semicircular bases.
The house is covered with plywood
Step 10 . Straighten the padding polyester and finishing fabric, stretching them over the “roof” of the house. Fix it on the back side of the house on a wooden base. Make sure that the materials are well stretched.
Materials must be well tensioned
How to fix materials
Step 11 . Using a glue gun, glue the materials along the lower edges of the sides of the house.
Glue gun used
Step 12 . Take the second semicircle made of fiberboard and cover it with finishing material.
The second semicircle is tightened
Step 13 . Using a glue gun, glue this semicircle of fiberboard to the back wall of the house.
The semicircle is glued to the back wall
Step 14 . Using the same principle - using a stapler and a glue gun - cover the bottom of the structure and attach it to the house itself. He's ready.
The bottom of the house is attached
Step 15 . Now get to the scratching post. Use a plumbing pipe or linoleum reel as a base. Place it on a piece of wood (chipboard, plywood) and draw two circles.
A circle is drawn
Step 16 . Using a jigsaw, cut out two wooden circles. Grind down the edges to make them smooth.
A round workpiece is turned
Step 17 . Use the resulting circles as plugs for the pipe. Insert them inside the pipe and secure with self-tapping screws.
The plugs are fixed with self-tapping screws
Step 18 . Start wrapping the rope around the pipe, securing its end at the bottom with a glue gun.
The pipe is wrapped with rope
Step 19 . As you move up, periodically glue some turns of the rope with a glue gun to ensure reliability. Remember to secure the top end of the rope once you have wrapped the entire pipe.
Upper end of the rope
Step 20 . Screw the finished claw sharpener to the fabric-covered base using long self-tapping screws.
Long screws required
Step 21 . Cut a circle out of chipboard or plywood and mark the places where the circle will be fixed to the top of the pipe. This will be the top resting area for the cat.
This will be the top platform
Step 22 . Screw the circle to the pipe. But first place a circle of finishing fabric on the pipe, face down. The diameter of a circle made of fabric is equal to the diameter of a circle made of wood.
The circle is screwed to the pipe
Step 23 . Cover the top of the circle with fabric and padding polyester using a glue gun or stapler.
Covering the upper platform
Step 24 . Use a stapler to secure the previously placed circle of fabric hanging on the pipe on the underside of the round area, tucking the edges slightly.
Upper play area
DIY scratching post house
The scratching post is ready. If desired, the upper platform can be supplemented with a side, and a toy on a rope can also be attached to it.