Cats 18503
Thanks to an automatic feeder, your cat will always have enough food. This is especially necessary if you plan to be away from home longer than usual. An automatic feeder will ensure that your cat is well-fed. But where can you get such a miracle device? Option one is to buy. The cost of such feeders depends on the configuration, manufacturer, type and ranges from 900-12,700 rubles.
Option two is to make an automatic cat feeder with your own hands from available materials. This method will help you not only save your family budget, but also show your creativity.
What is an automatic feeder
An automatic feeder is a device that will automatically pour food into your cat's bowl. The most important part of the design is the tank, where a lot of feed must be poured in advance. There is a pipe attached to this tank. The food will flow through the pipe directly into the bowl.
Automatic feeder allows your cat to eat at any time
Some industrial models have a built-in timer: you can set the feeding time on it, and then the food will go into the bowl at the right time. This is useful for those pets who are recommended to feed by the hour.
Types of automatic feeders:
- simple mechanical;
- electronic;
- "puzzle";
- with several compartments for dry and wet food, for water;
- with dispenser;
- with timer;
- with remote control;
A DIY cat feeder is a great gift for your beloved pet.
Thanks to the dispenser, the cat will not overeat
To sum up the DIY cat feeder
As you understand, it all comes down to assembling a pipe from sewer pipes and fixing it to the wall. This option requires that you are willing to sacrifice the fact that holes will be made in the wall. If this does not bother you, and you are also satisfied that the feeder will be stationary, then this option is for you. Also, despite the fact that the feeder is automatic, that is, food is supplied as the cats consume it. But the downside is the fact that the food does not end in the feeder. That is, she does not dose it over time, but simply adds it and adds it, which may also be unacceptable for some owners and cats.
Diet is one of the main criteria of health. Eating is a much more important procedure than it seems, not only for humans, but also for animals. Cat owners understand that they need to provide their pets with a special feeding regimen, but not everyone has the opportunity to be with them around the clock. In such situations, automatic cat feeders come to the rescue. It is very easy to make such a design with your own hands.
Advantages of automatic cat feeders
The feeder (automatic feeder) has many advantages. Many owners strive to make such a feeder themselves or purchase it in a store.
Automatic cat feeder with timer
Pros:
- Suitable for cats who are prescribed a diet, such as split meals.
- Dust, dirt, and excess moisture do not get into the food.
- The food won't dry out.
- The design with 2-3 compartments allows you not only to pour food in advance, but also to pour drinking water.
- You can put a lot of food in the feeder so that the cat can eat it for 2-5 days.
- There are feeders that allow you to pour a large amount of food, which will last for 90 days.
Automatic feeders with a large supply of food will help when the owner needs to leave for several days. In such cases, you need to choose a model with a built-in drinking bowl so that your pet always has fresh water.
Important! An automatic feeder is convenient if the owner does not like to get up early to feed the cat.
Such a device will be useful in a house where several cats live: all pets will be able to eat whenever they want, and there will be enough food for everyone.
Feeder "Puzzle"
Automatic cat feeder - part 1
I have a cat who only eats dry food. From an “operational” point of view, this is simply an ideal option: simple, clean, convenient. But there are a couple of points that bothered me a little: if you pour a lot of food into a bowl, the cat cannot stop until it fills itself to a spherical state; it is difficult to pour a little bit several times a day, since during working hours it is unattended. And, finally, if you have to leave somewhere for a couple of days, then upon arrival the cat greets you almost with tears in her eyes - there was no one to feed!
{ads2}
Therefore, I took the trouble to create an automatic feeder for a cat that eats dry food. Of course, you can buy a ready-made one for about 3,000 rubles, but this is the cost of food for almost a year - it suffocates the vile amphibian!
I decided to make a feeder from improvised materials. Currently, the project is in the first stage - the mechanical part of the dispenser has been manufactured, all that remains is to make the structure and electronics.
Dispenser
The dispenser is made of four main parts: an oblique plastic plumbing tee 50 mm, a plastic pipe with a diameter of 50 mm and a length of 35 cm and an electric central locking drive. These parts are shown in the photo. The fourth part is the cap from a spray bottle, for example, from hairspray, air freshener, etc., this part is shown in the photo below.
The plastic parts are subjected to slight processing with a knife, but it must be remembered that despite the apparent plasticity of the material, it is prone to cracking, so it is better to cut carefully, without fanaticism.
{ads1}
First of all, we remove all the rubber seals that are in the plumbing fittings. After this, carefully cut a hole in the influx of the horizontal part of the oblique tee , as shown in the photo. The slot width is about 4 mm, and the circumference is about 40 mm. The length can then be easily adjusted, so if you do something wrong, don’t worry.
The next stage is the manufacture of the feeder . To do this, cut a piece of about 15 cm from a straight pipe and cut a slot in it about 2 cm wide. I say all sizes “approximately” because... I did it myself “on the spot.” Due to the cheap cost of materials, you don’t mind ruining something, so I didn’t bother with the exact dimensions. The photo shows what should happen. The transverse cut in the slot should be made slightly wider than the slot itself - this is so that you can slightly compress the edges of the slot, reducing the diameter so that the feeder can be inserted into the tee.
Now we process the fourth element of the dispenser - the same cap from the bottle. We cut off the sides, leaving 12-15 mm from the bottom, drill a hole 12-13 mm from the center and fix an M4 screw there with a length of at least 20 mm. This cap will subsequently be placed on the uncut part of the feeder and secured to it with self-tapping screws, known among drywall makers as “seeds.”
We insert the feeder into the horizontal (straight) part of the tee . the feeder rotates, the slot will open a passage for feed, which will come from the oblique outlet of the tee . By rotating the feeder back and forth, we select 2 of its positions for the closed and open states.
{ads2}
You should strive to ensure that when open, the feeder slot completely falls into the lumen of the oblique outlet, and when closed, there remains a gap slightly larger than the average size of a grain of dry food. There is no point in achieving complete blocking of the outlet hole; anyway, through a gap of up to 1 cm, food does not spill out at all. After the open-close positions are determined, we mark through the slot the location of the hole for the lock, which should prevent the feeder from falling out of the tee and limit the angle of its rotation.
Having found the desired position, we take out the feeder , drill a hole, insert it back and install the lock , which is nothing more than an M4 10-15 mm long. You may have to work hard with the installation, because... The clamp be secured securely, and the screw must be turned from inside the pipe. But, since the screw is not far from the edge, and the pipe may still be slightly deformed, this process can still be completed successfully. As a last resort, you can drill another hole on the diametrical side of the pipe - for a screwdriver.
{ads1}
From this moment on, the narrative loses linearity, because... the adjustment phase begins. The photographs show ready-made positions of the component parts, i.e. found during the fitting process, everything is fixed, but when repeating the device, you should not rush to fix it! First you need to fit everything, everything, and only then fasten it. Although, if something goes wrong, you can always replay it - everything is attached with self-tapping screws, and the material is plastic, so there is always a path for retreat.
We put the cover on the feeder . Here you may need to remove any stiffeners that may be there the cover This is done with a knife or side cutters. The lid is put on quite tightly, while the feeder must be held on the opposite side so as not to press it inward and not to destroy the slot with the clamp. Now you see that if you apply some lateral force to the screw the lid the feeder will rotate and open and close the feed passage. Things are starting to become clearer, aren't they?
We insert into the oblique outlet the remains of the plastic pipe from which we cut the blank for the feeder. This will be called an extension pipe .
The last thing remains: installing the drive . We put its moving part on the cover pin and lightly secure it with a nut. Then we find the desired position of the drive (here I won’t give better advice other than “choose the position yourself”) and fix it with a long self-tapping screw, screwing it directly into the plastic of the extension pipe . You saw what should happen in the end in the very first photo of the article. 12V is applied to the drive the feeder , opening and closing the feed path. Having adjusted the position of the lid , we fasten it with “seed” screws in three places for reliability.
Tests can be carried out. We pour the food into the extension pipe (of course, the feeder must be in the “closed” position), hold this pipe vertically, while the oblique tee itself is inclined, making it possible to pour the food into the bowl. We supply a current pulse to the drive - oops! the food is spilling out! All that remains is to secure it all on some kind of base and make electronics that will send a short pulse to the drive and, after a split second, change the polarity of the current so that the feed is poured out only for a short period of time, exactly as long as necessary to pour out one portion of feed.
All photos (and additional angles) at once in the form of a gallery:
I will inform you about how the frame is made, the electronics circuit, etc. as the project progresses, stay tuned for more!
PS I plan to use a 5-liter plastic water bottle as a container for food: its neck fits perfectly into the pipe, and food can be poured into it for a couple of months!
{ads1}
Tools and materials
DIY dog toys at home
To make an automatic cat feeder with your own hands, you will need the following tools and available materials:
- plastic bottles;
- food containers;
- scissors for cutting metal;
- office supplies: knife, paper clips, eraser, clips, scissors;
- scotch;
- electronics (for a feeder with a dispenser).
Bottle device
Examples of industrial products
- The snow-white, rectangular table of the Ferplast brand is made of wood. The originality of the set is given by two porcelain plates of white and black square shape. This set can be a wonderful gift for a cute little cat or dog. Will serve as a successful addition to the apartment interior. More details>>>
- Japan Premium Pet, an online pet supply store from Japan, offers a wooden anatomical table for cats and dogs, complete with a rubber mat. Any utensils with food on this coating will not slip. And the height of the table is recommended by Japanese veterinarians: this makes it more convenient for pets to swallow food without trapping excess air. View>>>
- The KeramikArt model is made of metal. The product set includes two round ceramic plates with a rubberized bottom. Bright colors of dishes create a joyful mood and add an accent to the interior of the apartment. Check the price>>>
A simple automatic feeder made from plastic bottles
Cat harness: main types and DIY options
The simplest model can be made from ordinary plastic bottles.
Materials:
- plastic eggplants (bottles) with a volume of 5 liters - 2 pcs.;
- stationery knife;
- awl;
- scissors;
- glue;
- lace or rope.
Step-by-step instruction:
- Cut off the bottom of one of the bottles.
- Cut a spatula or scoop from the bottom.
- Cut 2 holes in the second jar. Their size should be equal to the height of the bowl spatula.
- Insert the spatula into the hole inside the bottle.
- Secure the structure with glue or rope.
- Add dry food.
This design is only suitable for feeding dry food.
Feeder with dispenser saves time
There is an easier way. Tools:
- food container;
- plastic bottle;
- stationery clip and paper clips;
- ball or small toy;
- scissors;
- rubber;
- stationery knife;
Step-by-step instruction:
- Trim the bottle so that its length is equal to the height of the container.
- Make a hole at the bottom of the container to insert the neck of the bottle.
- Make 2 small holes in the lid.
- Connect all the parts.
- Tie a rubber band to the ball or toy, pull it through the bottle and secure it to the holes in the lid.
Pour in food and secure the structure at a low height. Place a bowl below. The cat will touch the ball or toy, then the neck will open and the food will pour into the bowl.
Important! The kitten will love this feeder.
With a do-it-yourself dispenser
Design advantages
First of all, you should understand what is good about an automatic feeder and why it is so indispensable for pets. The main feature of this design is the portioned food supply. This property is very important, since all cats can be classified into several groups:
Most often you can find the third type - the glutton. The problem is that they cannot control the amount of food they consume. Even if the owner leaves the food in the bowl for several days, the cat will eat everything in 2-3 sittings. Of course, excessive oversaturation and subsequent hunger should not be allowed, because in this case the cat’s digestive system will suffer.
Installing a feeder with an automatic feeding mechanism will help to successfully distribute the load on the animal’s digestive system. In addition, such a design will be useful when the owner wants to form a certain food discipline in the pet. There are a number of reasons why it is recommended to purchase or make your own automatic cat feeder:
- Many pets like to eat at night, late in the evening, and also early in the morning. The automatic device is convenient because the owner does not have to get out of bed to feed the pet in the dark.
- The next argument is the cat’s optimal diet. It is preferable that the animal eats every 1.5-2 hours, but in small portions. In this case, such a device will become an indispensable assistant.
- Another reason to get an automatic feeder is the predatory nature that lives in every animal, despite domestication. The main instinct of cats is to independently obtain food. The purchased structure will not be able to provide game elements, but a homemade unit can easily cope with this purpose.
How to make a cat feeder from plastic pipes with your own hands
An excellent feeder with a large supply of food can be made from fan or plastic pipes.
Materials:
- straight plastic or fan pipe 1 meter long;
- board 1 m long;
- fastening - 2 pcs.;
- corner 90° - 1 pc.;
- corner 45° - 2 pcs.;
- cover - 1 pc.
Progress:
- Assemble the 45° and 90° angles and attach them to the lower end of the pipe.
- Attach a second 45° angle to the top end of the pipe and cover it with a lid.
- Attach the fasteners to the wooden board and insert the pipe into them.
- Sand the edges of the bottom 45° corner with sandpaper until they are smooth, otherwise the cat may get hurt.
- The pipe is attached to the wall. It is necessary that the pipe be covered by a canopy.
- Cat food is poured through the top hole in the pipe.
The pipes make a very convenient device
Feeder for cats and dogs
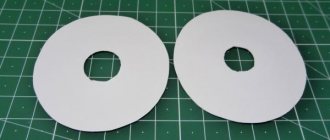
In this master class you will learn how to make a feeder for cats and small dogs with your own hands. We will make a convenient wooden stand in which we will place two bowls: one for food and the other for water. Making such a feeder for your pet is not too difficult. We have prepared for you a visual drawing with dimensions, step-by-step instructions and some useful tips.
To make such a cat feeder, you will need a special cylindrical drill attachment. With its help, we will need to drill holes to insert bowls into them. However, it is worth saying that you can take a drill and chisel and use them to knock out holes of the required size. We advise you to prepare metal bowls in advance so that you know what attachment you need or what hole you will need to make with a drill. Please note that in the diagram, the size of the hole in the feeder is given conditionally, taking into account the average size of a standard cat bowl.
See also: homemade bird feeders
What do we need?
- wood panel
- non-toxic paints
- two metal bowls
- self-tapping screws
How to make a feeder?
First, we suggest you take a look at the drawing of a cat feeder. We recommend doing it on paper and then carefully transferring it to a wooden panel.
We saw the wooden panel and make holes in the indicated places. If the surfaces are uneven, be sure to go over them with a plane and sandpaper so that the cat does not get a splinter when she eats from her new feeder.
We assemble the structure using self-tapping screws: 3-4 pieces on each side.
We paint the cat feeder with non-toxic paint and, if necessary, glue the bowls to the inside of the rim. If you manage to find a bowl with wide enough sides, you don’t need to glue it - just insert it into the hole (this is also convenient in terms of caring for the feeder - the bowls will be easy to remove and wash).
Please note that the feeder has sides - this is necessary so that the food does not fly to the sides when your pet eats lunch. We also advise you to use a special non-toxic craft varnish and cover the outside of the feeder with it. This way you can wash it and wipe it from traces of food and water without the risk of ruining the paint and the wood itself - the varnish will protect the craft from moisture and dirt.
Of course, cats and small dogs love to be capricious and will most likely pull food onto the floor at first, but over time they get used to the new “table”. Water is convenient right away - your pet won’t be able to spill it, and it will be convenient for him to drink.
We recommend watching: cat houses made from newspaper tubes
3+
Automatic watch feeder
An original feeding structure can be made from an old watch.
What you will need:
- quartz wall clock;
- bowl with compartments - 1 compartment in the middle and 4 along the edges;
- wide iron or plastic jar;
- board or block of wood;
- thin sheet of plastic or plywood;
- clay (environmentally friendly);
- rubber suction cups;
- scotch;
- scissors for cutting metal;
- pliers;
- nails - 2–3 pcs.;
- file;
- small battery in working order;
- flexible copper wire;
- lighter;
- felt-tip pen.
All starting materials must be environmentally friendly, without harmful substances.
How to do:
- Remove the mechanism from the watch.
- Cut the bottom from a wide metal or plastic can. The height of the sides should be about 3-4 cm. First you need to mark the line with a felt-tip pen, and then cut the metal with scissors or wire cutters.
- Using a file, polish the sharp edges of the cut bottom so that it is impossible to get hurt on them. If the jar is plastic, the edges can be made smooth by melting them with a lighter.
- Cut a small cube out of wood and insert it into the clock. This cube should be positioned so that the clock hands rise above the jar.
Now you need to prepare the feeder itself. To do this you will need a bowl with compartments. It can be made from clay, then wait until it hardens, and then bake it in an oven for 2-3 hours at 200 °C.
Important! The bowl should fit in the jar.
DIY watch feeder
How to connect all the parts to make a feeder:
- Fold the hour hand in half and secure it to the mechanism located inside the wooden cube using tape.
- Insert the battery into the mechanism. And use wire to attach its mechanism in the central compartment of the bowl.
- Cut a circle out of plywood or plastic. This is the lid of the feeder. Make several holes in the center of the circle for the screw that holds the arrows. On one side of the circle, cut a hole equal in size to one compartment of the bowl.
- Hammer 2 nails into the lid. The distance between them should be equal to the length of the arrow bent in half. Cut off the sharp ends of the nails.
- Cut another cover from plywood. Remove the fastening that holds the second hand from the clock and attach it to the underside of the plywood cover. Insert the second hand into this mount, cut it evenly and seal it with tape.
- Connect the feeder and the lid. Attach rubber suction cups to the bottom so that the structure does not slip on the floor.
You can decorate the feeder. Pour food into it and offer it to the cat.
Functionality
And having acquired such beauty, I will simultaneously resolve several important issues:
- I will separate the feeding zones of two pets: cats and dogs. After all, the dog not only eats his own food, but waits for the right moment to steal food from his neighbor’s cat. You have to keep watch, wait for the mustachioed-striped one to eat, or you have to put the feeder higher.
- On a wooden stand that matches the interior, the cat bowls look decent, not poor.
- Cat dishes are stable and do not slip on the surface of the countertop. And then the cat, in the process of eating wet food, pushes the bowl around the table. He diligently licks the plate and sometimes pushes it onto the floor. Metal bowls rattle on the tiles, and glass or ceramic bowls shatter. While I collect the fragments, pets may injure their paws.
- Two plates on one wooden rack take up little space on the kitchen counter.
- You can feed two cats at the same time.
- It is convenient to use one bowl only for granules, and the second for wet food. After all, bowls have to be washed regularly after canning or natural food.
- It is easier to maintain cleanliness and hygiene in the room.
- Benefits for animals with postural and digestive tract problems.
Automatic feeder with servo motor
A do-it-yourself cat feeder with a dispenser will allow you to measure out precise portions of food and serve it at the appointed time. You can make such a device yourself using a servo motor.
Tools:
- simple servo motor;
- continuous servo motor;
- Arduino controller;
- encoder KY-040;
- power supply 12 V, 1 A;
- auger 10 cm high;
- PVC tee with a diameter of 15 mm;
- alphanumeric LCD display based on HD44780 controller;
- button;
- hot glue;
- drill;
- jigsaw;
- food box (plastic, with high sides);
- mounting box made of MDF 9 mm thick.
With dispenser
Master Class:
- Take a ready-made auger or use an auger from an old meat grinder. Attach the continuous servo motor to the base of the auger.
- Test the mechanism inside the tee. If it works well and without interruption, secure it in the tee with glue.
- Cut 2 square holes in the MDF box (for the servomotor and for the control panel display), as well as 3 round ones (for the auger).
- Find a suitable panel on which the feed button, LCD display and encoder will be installed. Attach the structure to the box.
- Attach a small spoon to the servomotor bar for stirring food.
- Attach a food box to the body.
- Assemble electronic components using the Arduino system. Solder all components with a soldering iron.
To set a timer, you must first press the encoder, set the time, turn the encoder and press it again, confirming the action.
Making a cat feeder with a dispenser with your own hands will require skill from the owner and some material costs, but it will pay off well.
For your information! In stores, such feeders cost about 12 thousand rubles and even more.*
Automatic cat feeder using Arduino
Smart Home technology is becoming part of our lives more and more often.
Using this technology, you can control various household appliances from lighting to a kettle, from a lock to a split system or TV. Convenience, the possibility of many settings, planning and control from a smartphone, etc., are the advantages of a Smart Home. Also, using this technology, you can, for example, schedule feeding of fish in an aquarium, dogs or cats. A self-made man decided to build a cat feeder. The principle of operation of the feeder is simple. Two jars with holes. In the normal position the holes are not perfect. A servo drive is fixed in the lower bank. The servo drive shaft is fixed in the upper bank. At the specified time, power is supplied to the servo drive. The shaft rotates and turns the top can. The holes are aligned and a portion of food falls into the bowl. Then the jar returns to its original position. Tools and materials: -2 metal cans of different diameters; -Plastic jar; -Marker; -Servomotor MG996; -Bowl with two compartments; -Styrofoam; -Arduino; -Engraver; -Roulette; -Stationery knife; -Insulating tape (red); — Adhesive film; -Scissors; -Screwdriver; -Cable tie; -Wire; -Pliers; -The wire; -Heat shrink; - Lighter;
Step one: preparing the jars Makes markings on the jars. Cuts holes according to the markings (see photo). Makes holes in the center for the servo drive shaft.
Step two: decorates the jars Covers the jars with film. Decorates with red electrical tape. Step three: installing the servo drive Make holes in the top can and secure the servo drive shaft nut. The servo drive is mounted in the lower can. Connects two banks. Step four: dispensing window Cuts a dispensing window in the bottom can. The window should be located exactly under the hole in the bottom can. A tray is cut out of a plastic jar. Secures the tray. Step Five: Bowl Adjust the foam to the shape of one section of the bowl. Attach the plastic lid from the bottom jar to the foam. Installs foam into the section. Places the lid on the jar. Step Six: Arduino Drills a hole in the bottom of the can. Outputs wires from the servo drive. Connects to Arduino board. Brown wire to GND, orange to PWM pin 9 or 10. Insulates wires with heat shrink. The connection diagram can be viewed here. Link to code here. All that remains is to add food and test the operation of the feeder. As you may have noticed, the author has two feeders installed. The second feeder is activated when you press the button. The last photo shows the cat pressing the button. You can also watch the entire process of manufacturing and operating the feeder in the video. Source
Become the author of the site, publish your own articles, descriptions of homemade products and pay for the text. Read more here.
Automatic feeders of industrial production
You can find a variety of models of automatic animal feeders on sale. Many devices are equipped with a dispenser, timer, dispenser and even a sound signal. The best are considered:
- Catit Senses;
- Smart HD Pet Feeder PF03;
- Stefanplast Break Reserve;
- Feed-Ex PF100;
- Petwant PF-102 White;
- SITITEK Pets Ice Mini;
- 4SITITEK Pets Pro Plus;
- SITITEK Pets Tower-5;
- Ferplast Cometa Bowl;
- Petwant PF-105;
- Beeztees Cat Mate C3000;
- Triol;
- Cat Mate C50;
- Trixie.
Criterias of choice
The automatic feeder is selected based on the needs of the animal. In this case, the following criteria must be taken into account:
- Size and weight of the animal: the larger it is, the more food it needs.
- Find out in advance how many feedings the feeder is designed for.
- For a pet with an excessive appetite, feeders with a timer, dispenser and dispenser are suitable.
- If the cat eats enough food and does not overeat, you can make it a regular feeder.
- The structure must be strong and stable.
- The device must be made of environmentally friendly materials - metal or food-grade plastic.
Two bottles make a simple but convenient feeder.
The cat must quickly find a new “miracle of technology” on its own, so the automatic feeder is placed in the pet’s usual feeding place.
Important! Before leaving, the owner must carefully check the condition of the device. It needs to work perfectly.