Cats sleep most of their lives, 2/3 of them in fact. That is why a loving owner must provide a comfortable place for his pet to sleep. Moreover, it is very simple to make a homemade lounger, even from scrap materials.
You can make a comfortable bed out of old things without spending more than an hour, and most importantly, saving money, because we all know how expensive accessories for pets are in stores.
Cat sofa gathered with ribbon bows
To sew a cat bed with your own hands, you need to take:
- fabric in two colors, used can be used;
- ribbons to match the main colors - ready-made or made independently from fabric;
- padding polyester;
- sewing tool.
Master class: how to sew a cat bed
The pattern must be made keeping the proportions suggested below. Decide on the size of the sleeping area for animals yourself, depending on the dimensions.
On the cut out parts, mark the places for threading the ribbons.
Sew around the perimeter of the sofa, leaving 12 cm open areas on each side for filling.
Turn the product inside out.
Fill all areas with filler, paying special attention to the side walls, since maintaining the shape of the sofa depends on their stability.
Sew along the perimeter of the bottom pillow, sew up the remaining open areas with a hand-blind stitch.
Tuck the side walls and tie the ribbons, securing the connection. The bed is ready!
Choosing a suitable location
Any cat tries to find a place in the house where no one will disturb him. Often there may be several such places. Animals spend most of their lives sleeping. It happens that a cat falls from the bed onto the floor. That is why every owner, when installing a structure on a windowsill, must fix it so that it does not fall. Pets will be happy to settle down on the bedding, which will have a good view of the street. In winter, it is better to place the lounger on an ottoman near the heating radiator.
Quite often, cats choose a place next to their owners, regardless of what the latter do. Every loving owner notices that the pet tries to stay somewhere nearby. You can place the animal on a soft bed on the back of the sofa or next to the bed so that the cat can watch when the owner is resting.
Many pets are comfortable being at a height, for example, on a closet with clothes. This is due to the fact that in this way they can control everything that happens around them. Often the back of a chair can become a favorite sleeping place for a cat. That is why it is important to place the bed not on the floor, but on top of some piece of furniture.
If the cat has offspring, then it is better to make a bed with high sides and install it in quiet, dark places. This is explained by the fact that a caring mother tries to hide her kittens from prying eyes. If the side of the lounger is equipped with an entrance, it is better to close it for a while so that the kids do not crawl out.
Loving owners try to equip a cozy place for their pet where he will feel comfortable and safe. Having received its own lounger as a gift, the cat will not settle down to rest on other home furniture. Making a cozy bed for your pet with your own hands will help you save a lot of money.
DIY soft sofa-bed for a cat
To make a cat bed you will need:
- fabric for covers of main parts;
- a small piece of dense fabric for the bottom;
- filler;
- threads, sewing tools.
How to sew a bed
The pattern of such a cat bed is very simple. Two rectangular parts of the pillow are cut out in sizes sufficient for the size of your pet. The bottom part has similar dimensions. The two side panels and the back wall consist of two identical rectangular parts. The front side, also consisting of two identical parts, has a recess in the center for entry. The height of the sides of the sun lounger can be made to any height.
Next, we’ll take a step-by-step look at how to sew a rectangular cat bed with your own hands.
We sew the details of the sides around the entire perimeter, leaving an open area for turning and laying the filler. We fill the details tightly, sew up the edge with a hidden seam.
Sew the side walls together.
We sew the bottom by hand, tucking the edges inside.
We assemble rectangular blanks for the pillow, folding them with the wrong sides, leaving a hole for stuffing. Turn the product inside out and fill it with filler. We sew the left hole by hand.
We place the pillow in the finished sofa for the cat.
Sewing a bed with sides
To make such a product, you will need a piece of foam rubber or padding polyester, suitable fabric, thick cardboard, scissors, a needle, thread, a ruler and a pen. You can use an old unnecessary pillow as a base. It is necessary to cut three parts: two narrow rectangles for the sides and one large one for the base (bottom). They take the part that will be the bottom, round its edges, ultimately forming an elongated oval.
For reliability, you can sheathe the edges of all three blanks to prevent the padding polyester from falling out and sliding. The sides are connected to each other. After this, they take the fabric, lay it out on a flat surface and cut it out according to the size of the padding polyester blanks (cut old pillow). Having cut out a rectangle of sufficient length, grind it down in the middle and put the sides on the part.
Next, the side is connected into a ring, the allowance is packed inside, making a secret stitch. After this, the sides are sewn to the base. This can be done with a machine stitch, pinning the board to the base with the edge matching.
To make cleaning or washing the product easier in the future, you can put a small rug or small pillow on the bottom. Suitable for bedding and bedspread, and even a crocheted oval rug.
An original lounger can be a model in the form of a sofa. To complete this you will need polystyrene foam, ten-centimeter thick foam rubber, as well as textiles. In addition, you will have to use glue in the work. Four parts are cut out of foam plastic: the base, the back and two sides. In this case, you should get two large rectangular blanks and two small ones.
The back (large part) is glued to the seat, and the sides are glued to the sides. It turns out a kind of frame, similar to a sofa. To refine the structure, it is thickened with foam rubber, cut to the same dimensions as the first four parts. If you want to make the sidewalls soft on three sides, take measurements and cut out elements of greater width.
After the foam rubber is glued, you can begin making the upholstery. To prevent the product from making an unpleasant squeak in places where there is no foam rubber, the cover can be sewn from dense fabric. For example, fleece or textiles with large pile, which are used in the manufacture of blankets, are well suited for this. If you have an old blanket at home, that will do too.
Having taken measurements of the sofa, they make a pattern for the cover, then lay it out on the fabric, cut out and assemble the upholstery on a sewing machine. In this case, you can also use elastic textiles: they can stretch and therefore fit better than regular fabric with plain weave threads. This material is called bielastic; it stretches both lengthwise and crosswise. Having sewn the cover, it is put on the prepared base.
To delay the time of cleaning your pet's sofa, you can place a small rug on its seat.
Round cat bed
To sew a cat bed with your own hands, you need to prepare:
- textile;
- sheet foam rubber for the bottom;
- filler;
- threads, sewing tools.
How to make a cat bed
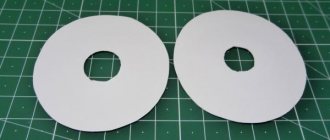
We mark on the fabric and cut out the details of the outer and inner cover of the cat bed. Their size is equal to the size of the cat plus 20 cm on the sides. When cutting, it is convenient to immediately fold the fabric into two layers and cut out both parts at once.
From a sheet of foam rubber, cut out a circle with a diameter equal to the cover minus the sides.
We place a circle of foam rubber on the wrong side of the outer cover in the center, and cover it with a piece of the inner cover on top. We chop off the parts, fixing the position.
We sew in a circle. Then we mark the seam lines for stitching. When sewing a bed of this size, four lines at 45 degrees will be enough. We perform these lines across the entire diameter of the covers, forming sections for stuffing.
We fill the sections of the sides with filler.
We compact the filled cells.
We connect the edges of the outer and inner covers, sew them together, and gather them together.
The result is a soft basket for a cat.
To process the cuts, we cut out the facing. We process the edge using a machine or with a hand seam.
The soft cat basket is ready!
Various production options
As practice shows, sewing a bed for a cat is not so difficult. To do this, you need to take a piece of soft material, cut out the desired shape, stuff the product with filler, and then trim the edges. For these purposes, you can also use some of the owner’s old clothes. A smell that is familiar to your pet will certainly be perceived positively. An animal can take a long time to get used to a store-bought bed or ignore it altogether. For production you will need:
- newspaper or piece of cardboard for making a pattern;
- reinforced thread to match the fabric;
- needle;
- ruler;
- dense soft material;
- felt-tip pen;
- scissors;
- needle threader;
- pins for fixing parts;
- filler for stuffing (at the owner’s request, this can be padding polyester or holofiber).
You need to take into account some of your pet's habits. For example, if the cat likes to sleep on the owner's bed, it is better to use fabric for sewing bed linen. It is quite simple to sew such a bed, but if the material is made of cotton or silk, the design will not last long.
For the manufacture of products, it is recommended to use mixed materials containing equal amounts of cotton, as well as viscose or polyester. Such fabrics are more durable and can withstand many washing cycles without any difficulties. Jeans are difficult to process, but it is quite easy to remove the wool from it, so care procedures will not take much time. Linen fabric wrinkles a lot; it is best to use it to make a cover for a removable mattress for a sun lounger.
To secure a part of the product manually, it is recommended to lay a blind seam. It is performed as follows: first, the needle is injected from the wrong side to the face and back, then the thread is secured with a knot. Next, both folded edges are connected, a stitch is made from the wrong side, and the thread is brought to the face. The folds are reconnected by tensioning the thread. To fill the lounger, you can use worn sweaters, scraps of other materials, if the existing filler suddenly is not enough.
Sun lounger with high sides
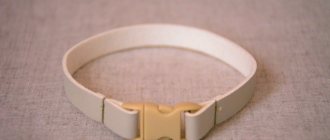
To fill the sides, you need to use foam rubber or fix the top edge on a cord, which needs to be tied in a knot. Another possible method is to quilt the stuffed border with a parallel stitch or use bartacks at a distance of 3-5 cm from each other. This is necessary due to the fact that after stuffing, the size of the sides is significantly reduced. The step-by-step process of sewing and creating a pattern for a cat bed with your own hands looks like this:
- The first step is to draw a circle on a newspaper or a piece of fabric folded in two layers. Then from the center you should set aside 20 cm on all sides (this is necessary in order to get a bottom with a diameter of 40 cm). The sides are made 20 cm high, 3 cm is added for the top seam (a ribbon or braid will be threaded into it). The total diameter will be 86 cm.
- To improve the strength of the product, the resulting circle is divided into 12 equal parts. This can be done in several ways: in the first it is assumed that the diameter of the bottom is not divided; in the second option, each part corresponds to the diameter of the circle, but the center of the structure is not outlined by 10 cm (otherwise it will not be possible to lay the filler, because it will be very narrow). The lines are secured with pins, then stitched by hand or using a sewing machine. The stitching must be done on the right side of the material.
- Then each segment needs to be filled with filler. The sides are sewn at the top by laying two lines, between which the tape will then be threaded. The edges of the material should be carefully folded inward and sewn with small stitches, leaving 2 holes for the braid. The latter needs to be threaded through the top edge and the ends tied together.
- If desired, you can decorate the sides of the bed with lace or frills. The edges of the frill need to be hidden under the trim. Separately, you can make bows or butterflies from a material that matches the color scheme. The simplest way to decorate is to tie a thread around the top of the sides so that protruding balls are made from the main material.
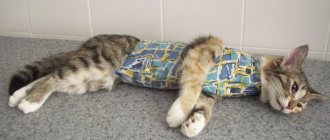
Cat pillow product
A pillow-shaped bed is more suitable for an adult pet, not a kitten. This is explained by the fact that babies do not like open space. The inside of the product must be tightly stuffed with holofiber, padding polyester or synthetic padding. The design can be of any shape:
- square;
- rectangle;
- heart;
- circle;
- The bed can also be made in the style of a dog or cat's face.
The cut of such a lounger is quite simple, because the upper and lower parts are the same in shape. The size of the structure is calculated taking into account the length of the animal. If your pet likes to sleep in an extended position, you need to consider its length with four outstretched legs. On average, these figures range from 90 to 120 cm (it all depends on the breed and age of the cat). To cut all the parts, a piece of material must be cut into two equal parts. Step-by-step manipulations:
- To cut a heart-shaped bed, you need to fold half of the prepared material in half with the right side inward. To prevent the fabric from moving, the edges must be secured with pins. Then along the fold you should measure a distance of 38 cm from bottom to top. This will be the main point of the entire pattern. From there, using soap, you need to draw the left-side half of the heart (the left half because the fold of the material is on the right). The width of the half is 30 cm from the center, the total height is 53 cm + 2 cm for allowance.
- The resulting half of the heart must be cut out and then placed on the second part of the material, folded in half. Then trace and cut out the part.
- Fold the bottom and top of the product facing inward, pin and stitch, leaving 15-20 cm for stuffing.
- Turn the structure inside out and insert the filler. Fold the edges and sew with a hidden seam. Make through fastenings across the entire area of the lounger at a distance of 15-20 cm.
- To decorate the side seam, fringe or lace is sewn on. The work can be considered completed.
Bed sofa
At various exhibitions, owners show off their cats lying on small copies of various designer furniture. Basically, expensive material with bright colors, patterns and a velvet surface is used to make such sun loungers.
The frame is formed from layers of foam rubber, to which glued cardboard parts are added. Sofa decor is often done along all visible seams. For these purposes, cords with golden threads, tassels, and bright fringe are used. The fasteners are decorated with sparkles that imitate various precious fabrics. A similar design on store shelves will be quite expensive.
The two-cat sofa lounger consists of separate parts: one or more armrests, a seat, a backrest. Each piece of furniture, as well as its cover, is made according to different patterns and then joined together.
To make a rectangular structure with a round back, you will need cardboard and foam rubber that will hold the three-dimensional shape of the elements. The upper part of the product is often sheathed with furniture material (usually tapestry or chenille measuring 60 by 150 cm is used). The work is carried out in the following sequence:
- First you need to create patterns for all four structural elements. The first part is the bottom, 6 cm thick; the dimensions of the rectangle of material should be 62 by 72 cm (taking into account allowances). The next detail is the back of the structure. The drawing is applied to paper or directly to the material, folded in half with the front side inward. The width of the top of the back is 62 cm. Then up on both sides you should put 6 cm and draw a line that will be parallel to the bottom. Set aside 19 cm from the center and mark it. From the latter, two arcs should be drawn down on both sides. The height of the backrest should be 25 cm.
- Next, the back is cut with an allowance. After this, covers are made for the armrests, the size of which is 40 by 26 cm. After applying the markings, all structural elements are cut out.
- The parts need to be pinned together, swept away, and then put the cover on the bottom, leaving an open side that will be fixed on the back. Then all the details need to be turned onto the face.
- Fill the covers with filler until it stops or insert pre-cut foam rubber. Connect the parts into a single structure.
Cat bed made from denim scraps
For such a creative bed you need to take:
- patches of jeans in two shades;
- padding polyester for the bottom;
- filler for sides;
- soft fabric for the bottom, for example, fleece (you can use an old terry towel);
- sewing tool.
How to sew a cat bed with your own hands
First, let's sew a side for the bed.
Its size is 24 by 157 cm. Let's prepare 12 rectangular parts of the same size - six of each color.
We sew them together from the wrong side, alternating stripes by color.
Iron the seam allowances in different directions and sew a zigzag stitch along the front side.
We sew the strip into a ring.
For the bottom, cut out a circle with a diameter of 48 cm. Decorate it with applique. We cut out a fragment and attach it with contrasting threads along the perimeter using a zigzag stitch.
We lay the bottom elements in layers - an outer cover, padding polyester, a bedding made of old soft fabric, an outer cover. We cut off a “sandwich” and sew around the circumference. If desired, you can quilt the bottom to prevent the padding polyester from moving when washed.
We sew the edges of the sides with a zigzag or process them with bias tape. We machine sew the edge along the circumference of the bottom, leaving open areas for filling.
We fill the side with padding polyester, compacting it well. We sew up the remaining holes by hand.
The bed is ready and approved!
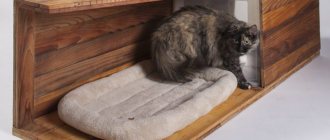
Bed for battery
It’s no secret that cats are constantly looking for shelter in the warmth, and especially in winter, when they settle down under or on the radiator. To make your pet more comfortable, softer and warmer, you can make a small hanging bed. For example, from a piece of PVC pipe of sufficiently large diameter, and from several hooks for hanging.
To make the lounger beautiful on the outside and comfortable on the inside, cover the plastic with soft fabric and a thin layer of foam rubber or other filler. Keep in mind that the pipe is smooth and slippery, so it is better to secure the edges inconspicuously inside with construction glue. Make sure that the filler does not bunch up, otherwise it will be uncomfortable for the cat.
If you want to remove and wash the upholstery, secure it with Velcro. You don’t have to buy fabric specially: old towels, bathrobes, an unnecessary blanket—anything will do. Hooks and rings can be of any shape and configuration - study the assortment of your nearest hardware store and choose something that fits the size of your battery.
Bed with frill
This bed will appeal not only to adult felines. Both a kitten and a small dog will enjoy relaxing in it.
For sewing you will need to take:
- old jeans in two colors;
- cotton lace;
- fabric for inner covers;
- filling – synthetic fluff or holofiber.
How to sew a cat bed
The side of the bed consists of seven parts. We cut out 7 parts 12 x 22 cm from fabric of one color, 7 parts 10 x 22 cm from fabric of the second color. The combined part from two multi-colored flaps will be square.
We sew the flaps into a common strip, inserting gathered lace into the seam.
In this case, it is important to control the coincidence of the seam lines when sewing different strips.
Fold the finished side in half, orienting the placement of the lace frill in the center of its outer side. We pin the fabric with pins, fixing the fold line.
According to the size of the sections of the side, we sew small pads of fabric for the inner covers. We fill them with filler.
For the bottom, cut out two circles with a diameter of 45 cm.
We sew a fabric bottom for the inner cover and fill it with filler. We sew the outer bottom cover from denim on the top side and cuffs from thin material on the inside. It is convenient to do it with an elastic band - see photo.
We attach the inner side of the side to the circumference of the bottom. We insert the pillows filled with filler into the sections.
We manually sew the edge of the outer side of the side, tucking the edges inward.
How to make it from scrap materials?
It's no secret that pet beds are not cheap. In addition, there are often cases when after purchase they turn out to be not so convenient. It seems that the size is too small, and the sides are not high, and in general you want something special.
If you have sewing skills, this is not difficult: often homemade options are more interesting and functional. Moreover, even improvised materials can be used for work.
Having understood what cat beds are, you can begin to choose the appropriate option, examining what may be useful in your work. Moreover, if you have the necessary raw materials and free time, you can make not one, but several beds. But first, it is important to take into account the mandatory manufacturing conditions.
- The materials chosen must be durable and able to withstand the wear and tear of teeth and claws.
- The product must allow for cleaning or washing; practicality is important.
- The dimensions of the bed must be sufficient to comfortably accommodate the animal.
- The material used to make the bedding should not be prickly or electrified. You should not make a product from fabric that attracts dust.
- When making several products, you need to vary the degree of softness of the pillow. An animal needs more than just soft bedding.
- When making it, it is preferable to choose available materials that will be in harmony with other elements of the interior of the room where the cat’s cozy nest will be located.
In addition, the product must be safe for the animal itself. This aspect is especially important for beds that are placed at any height (for example, attached to a radiator or placed on the wide back of a modular sofa). Therefore, flimsy structures that can fall off when the cat constantly jumps are excluded. It is also important to think about the fact that, if possible, you can make a small depression inside the litter. Or you can simply fill the pillow loosely with filler.
The choice of this or that material depends on the preferences of the owner and his skills. Some people find it easier to sew a bed, others prefer to work with wood and glue, subsequently creating coziness with an ordinary pillow. Still others don’t like to spend a lot of time and resort to the most unexpected solutions, for example, creating a cozy corner out of ordinary slippers.
Therefore, in each case the choice of material will be individual.
For example, you can make a cozy nest out of jeans, calico, an old blanket, sweater, or parka. The padding of such sun loungers is made of foam rubber or padding polyester. Sometimes such products resemble bean bags on a reduced scale. Such products look not only unusual, but even stylish, becoming the “highlight” of the interior, and especially when they are made in the same color and texture scheme with the general concept of the style of a particular room.
Those who like rigid structures can use a suitcase, box, thick cardboard, wood or even PVC pipes as a base. The denser the base, the greater the durability of the product. Thoughtful options are great because they can include removable covers. This is good for cleaning or washing, and therefore zippers or Velcro can be used in production.
From newspaper tubes
Cat beds made from newspaper tubes are nothing more than a technique for weaving baskets. They look incredibly beautiful, although the process of making such beds with sides is labor-intensive and takes a lot of time. Models can have sides of different heights, be decorated with ears, resemble baskets, baby carriages, large plates, Indian wigwams and full-fledged houses.
Such beds can be painted with food coloring, covered with stain or even with PVA glue diluted with water in equal proportions. To make such cat furniture, newspaper is cut into strips of 8-10 cm, a knitting needle is placed on them and twisted into tight tubes, having previously secured the end with glue. When weaving, one end will be inserted into the other, and therefore the product will be devoid of joints and weak connections. At the beginning of weaving, the bottom is prepared from cardboard (in two copies).
The tubes are glued together like snowflakes, creating a lattice through which other elements will pass. Having braided the resulting frame, they proceed to making the walls, for which they also create a kind of lattice with the same pitch of glued tubes. Using this principle, you can make different designs of cat beds. At the same time, the weaving can also be different. For example, to weave walls, you can take not one, but two pieces at once.
From the suitcase
This base is an excellent solution for creating a cozy corner for your cat. As a rule, the area is enough to comfortably accommodate a large animal, provided that not a thin, but an ordinary pillow is placed inside. If desired, you can upgrade the bed by adding reliable legs. This can be done in the simplest way - using an old stool. It can be renewed by painting or varnishing, then screwing a suitcase through it, and placing a custom-made mattress on its bottom.
If you don't want to screw the legs, you can simply glue one side of the suitcase to the seat of the stool using especially strong construction adhesive. It’s not difficult to sew a mattress: measure the dimensions of the bottom of the future bed, cut it out of foam rubber and fabric (for textiles, add seam allowances). After this, the cover is sewn, put on the foam rubber, and the remaining space for threading is closed with hand stitches.
To extend the life of the mattress, you can cover it with a small sheet or place a small rug on top of it.
If desired, you can make not only one-, but also a two-story deck chair from a suitcase. To do this, it is divided into two parts, a wooden frame is created, and both blanks are attached to it at a distance sufficient for the animal to fit on the lower tier.
To prevent the bottom from sagging over time, the frame for the suitcase can be reinforced with shelves. It is preferable to make the mats themselves removable; there is no need to fix them with glue, because from time to time they will have to be shaken out and cleaned.
Under the battery
In winter, cats often look for a place near a warm radiator. Sometimes they nest underneath it, sometimes, in search of warmth, they try to sit on the windowsill. To create comfortable conditions for your pet, you can make a comfortable lounger-house for her from a PVC pipe of sufficient diameter, purchased at a hardware store. In addition to it, you will need fastenings with hooks, with which the original house can hold on even with constant jumps.
Fastenings can be of a wide variety, including with rings for framing the ends of the pipe. In order for the cat to feel comfortable inside, and for the outside of the house to also fit into the concept of the interior style, you need to select materials for upholstery and soft bedding. Considering that the plastic can slide, the inner and outer parts will have to be fixed to the pipe with glue. At the same time, it is necessary to ensure that there are no folds or sagging of the material - this will spoil the appearance and reduce the comfort of the product.
A similar lounger can also be made of wood. To make it comfortable to sit on, you should choose soft upholstery, enhancing comfort with foam rubber or a separate pad fixed to the base with Velcro. As the main textile, you can choose towels, an old bathrobe, a soft, unnecessary blanket, or even a pile rug. As for the structure itself, it can be one-, two-, or three-level. To ensure strength, you need to make sure that the bends of the hooks are large enough so that the product is securely attached to the battery.
It is better to make the covers removable, or you can supplement them with removable sheets, which, if necessary, can be easily removed and washed (cleaned of wool).
Do-it-yourself cat house bed without a pattern
To make a cat house you need to take:
- fleece - with a width of 1.5 m you need 1.5 m;
- padding polyester - with a width of 1.5 m you need 1.5 m;
- thick flexible cord to give the roof its shape.
- threads, sewing tools.
How to make a bed
For the roof, fold the fabric in half and cut a strip of 30 cm by 1 m.
We cut out a strip from padding polyester to insulate the roof. Its width should be slightly less than the width of the fabric strip.
We sew up the edges of the roof, leaving one of them open. Insert the padding polyester and straighten it out. Sew up the remaining edge using a hand blind stitch.
We quilt the roof part by making transverse and longitudinal stitches at equal intervals.
As a result, we will increase the rigidity of this part.
To cut the back wall, bend the roof along the line you have chosen and place it on the fabric folded in half.
We outline the outline of half the part, using the roof as a template.
We remove the roof part, fold the fabric in half and cut out the entire back wall part along the marked line.
Using the cut out part as a pattern, we mark the contours on the padding polyester. The insulation pad should be smaller than the outer fabric.
We make seams around the perimeter. We insert the padding polyester and quilt it, repeating the profile of the part with lines. We sew the remaining seam by hand.
We chop off the roof and back wall. We sew the parts together with a hand blind stitch.
For the side we cut out a strip. The finished dimensions of the part are 15 by 60 cm. If necessary, adjust the dimensions according to the actual measurements of your product.
Sew along the edges of the border, leaving a gap for filling. We place the filling, quilt, and sew up the edge of the part by hand.
For the bottom, you can use the same fabric as for the rest of the parts, or you can replace it with a combination of faux leather and knitted velvet. We cut out the details.
We line the bottom with padding polyester so that the bottom mat is soft and warm. Immediately cut out the cat pillow according to the size of the bottom.
Quilt the bottom.
Let's start assembling. First we sew the side to the roof. Then we grind the bottom with this design.
We sew a cord along the inside of the roof that will hold the shape of the part.
If desired, the cord can be decorated with fabric or, before stitching, inserted into a narrow case and sewn on.
Sofa for a cat: video master class
More wool: pot and basket
Natural six as a material for a cat bed is good not only because it smells like the owners for a very long time. Wool in products perfectly removes static electricity from cat fur. A domestic cat, which does not get wet in the rain or roll around in the dust, is sometimes annoyed by injections of static micro-discharges no less than mosquitoes are to us. The best option for a woolen bed for a cat, incl. with kittens - a bed-pot made of natural felt, see picture. Once upon a time in village huts, cats and kittens were kept in worn-out peasant summer hats, and from the cat’s point of view, this is a luxury-elite bed.
Felt potty bed for a cat
Forming (drawing) felt is a rather labor-intensive process that requires certain skills. You need a solid block (in this case, a glass lampshade from a table lamp will do) and 70% alcohol. A piece of felt is gradually covered over the blockhead, starting from its top. During the covering process, the felt is also gradually moistened with alcohol starting from the middle of the piece.
Wood also retains the human scent for a very long time, so even more often than from old hats, beds for village cats were made from baskets that had become unusable. How to weave a basket from a wicker is another topic, but that’s not the point here: the wood is saturated with the smell of a person for a very long time, and before that cats don’t like it. That is, for a wooden basket to be suitable for a cat, it must be used for a long time. However, there is an option that will acquire the sweet scent of the hostess even during the manufacturing process: a basket made of merino wool yarn intended for bulky knitting. A blanket like this will cost about $200, so it’s better to make it the cheaper way. But there’s nothing for a cat basket, and it’s not difficult to knit it, see next. plot.
Video: knitted basket for a cat
Bed in the form of a slipper
This type of bed is the realization of an eternal cat’s dream: to sleep on the owner’s slippers.
To make it you need to take:
- dense fabric, preferably of natural composition - two pieces 38 by 54 cm and two pieces 42 by 52 cm;
- insulation;
- sewing tool, thread.
How to make a cat bed with your own hands
The pattern of a cat bed in the form of a slipper is shown in the figure below.
We sew the blanks in pairs, leaving gaps for filling.
Turn it inside out and stuff it with sealant. We sew up the areas left open by hand using blind stitches. We quilt by completing the line as described in the previous master class.
We sew the top of the sneaker to the sole using a decorative overlock stitch.
Hanging bed for freezers
Any cat will approve of such a bed near the radiator, but creatures with a lack of fluffiness will show greater delight. To make this cozy place, you need a piece of large-section PVC pipe. Its length is the length of the bed. You will also need soft fabric, a piece of filler and sewing supplies.
- Measure the circumference. Two pieces are cut out of the fabric: one has the length of the pipe and a width equal to its circumference, the second is 20 cm wider than the first.
- A small section is sewn on a machine. It will be the “inside” of the pipe. You can put a piece of foam rubber under the area that will be the bottom.
- A large section is stitched, put on the pipe, and the ends of the resulting sleeves are sewn together by hand.
- The bed is secured with a curved iron rod, straps or chain.
Furniture for cats from scrap materials
It is not necessary to buy new fabric in the store - you can make a cat bed:
- from old pillows;
- from a knitted sweater.
Master class on creating a cat bed with your own hands from pillows:
- take a pillow, a long piece of fabric for the side and foam rubber;
- cut out a foam board around the perimeter of the pillow (here you can exercise your imagination - make it flat on all sides or low in the front so that the fluffy queen does not have to jump over it when going to bed;
- cut out and sew a cover for the side from two pieces of fabric;
- insert the foam base of the side inside, sew up the hole;
- sew the side to the bottom - it can be made of durable thick fabric or cut out of thick cardboard and covered with fabric;
- put a pillow on the bottom.
It’s even easier to make a cat bed out of a sweater with your own hands. Take a knitted sweater, carefully sew up the neckline, and sew the sleeves to the sides of the jumper.
Make a seam, separating the bed from the sides, stuff the bed and sides with padding polyester and sew the sleeves together to make an oval or circle.
If desired, cut off or decorate the cuffs with fabric - sew a beautiful bow made of fabric to them.
If you wish, you can not overstuff the central part of the bed, but make a removable pillow - it will be easier to care for the bed.