How to wear?
There are times when the veterinarian did not put a collar on the animal or when you made one yourself.
In such cases, the question arises: “how to put it on correctly?” To do this, you need to follow some simple rules. First, you need to measure the cat's neck so that the collar fits. It should not dangle, but also not put pressure on the neck. Then prepare the collar. Attach it to a collar or piece of soft cloth. If the animal is scared, then take it, wrap it in a soft towel and calm it down. You need to put on the collar very carefully so as not to cause harm. Many animals do not like having foreign objects put on them, and cats can behave aggressively. In this case, you will need an assistant.
Then you will have to hold the cat by the scruff of the neck. Once her head is in the collar, try to calm her down. Then attach the collar to your neck. Check that nothing is pressing or loose. There should be a finger space between the collar and neck.
When is a protective collar needed?
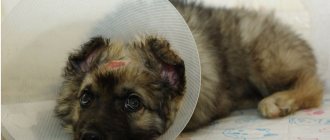
This device is necessary in order to protect problem areas on the animal’s body from external influences, to avoid their damage and infection in the wound. A neck cap for a dog is made in the form of a cone - this shape eliminates possible contact of the pet (with the help of paws or tongue) with the injured area. The device frees the owner from the need to regularly bandage the wound, causing significant inconvenience to the animal.
On a note! The dog gets used to the collar in 2-3 days. Veterinarians advise training your pet to wear the accessory in advance (at least a week in advance) if surgery is planned soon.
Indications for wearing a collar are:
- rehabilitation period after surgery (abdominal surgery, castration, sterilization);
- false puppyhood (so that the dog does not lick the nipples and does not stimulate milk production);
- diseases of the ears and eyes;
- skin pathologies;
- deworming (to prevent re-infestation);
- healing of cropped ears;
- burns;
- treatment of fur to protect against skin parasites, such as ticks or fleas (if you do not wear a protective dog collar, the pet will lick the drug, which can lead to poisoning of the animal).
This is interesting! The medical headband for dogs was invented by veterinarian Frank L. Johnson in the 70s of the last century. He drew attention to the similarity of the device with a collar for ladies of the court. Thus the design received the name “Elizabethan collar”.
Types of collars
You will probably be surprised, but if you approach the issue of buying a collar with all seriousness, then the variety of shapes and sizes will frighten even an experienced four-legged owner. Each manufacturer makes its own arguments and demonstrates the advantages of its products.
Anti-parasitic collar (from fleas and ticks) - a rubber product impregnated with repellent. Naturally, you cannot make such a collar yourself; you need to buy it. However, a sad anti-parasitic collar can be decorated; it won’t make it any worse.
A decorative collar (not a walking one) is a widely popular accessory for cats participating in exhibitions and shows. Choosing a decorative collar is a whole science. Some cats need accessories in contrasting colors, while others prefer collars that blend in with the fur and are decorated with a pendant. The width of the collar is also important, since it should not visually distort the proportions of the animal’s body. If you are unsure which collar is right for your pet, the choice should be based on the criteria of lightness (low weight) and softness of the material.
Decorative collars that are not for walking purposes can be purchased from folk craftsmen. The fact is that beautiful, bright and exclusive collars are not difficult to make at home. Below you will find step-by-step instructions for making different types of these accessories. Prices for handmade products fluctuate and mainly depend on the workload and reputation of the craftsman.
Walking collar – the difference between this and the previous model is the presence of a clasp that will open under the weight of the cat’s body. The fact is that while walking, a cat can get caught on something. There are known cases where pets hung on branches, fences, table hooks and suffocated. A cat can get stuck if it tries to crawl through a narrow gap and starve to death. The self-release mechanism will release your pet from captivity if sufficient pressure is applied to it.
A collar with an address tag is the most useful variety, as it serves not only for decoration, but also for security. An address tag helps pets find their way home, and if you think your cat won't get lost because she won't leave the house, don't be overconfident. Hundreds of animals disappear without a trace, falling out of a window or running out the door in the chaos. Of course, you are not obligated to buy exactly the proposed model; the token can be purchased separately or made.
The function of such an accessory is to prevent hunting so that the cat cannot catch a bird or rodent (a potential carrier of a virus or parasites). The 24-hour ringing with every step will greatly irritate your pet.
The role of adaptation
The pet collar has an unusual name - Elizabethan. This is a medical device for cats that performs a protective function. It protects your pet from licking wounds, scratching, and gnawing on stitches.
READ How long do rats live? Life expectancy of pets, lifespan in the wild
The thing is that the behavior of cats is to heal themselves, and by licking wounds, the animal tries to speed up the healing process. However, this often has negative consequences, because with saliva, not only lysozyme (promotes healing), but also many infectious pathogens that are found in the oral cavity enter the wound area.
To prevent the cat from licking and scratching its wounds, a veterinary collar was invented. The device can be used in the following conditions:
- Early postoperative period. After abdominal surgery, a suture remains on the cat’s skin. Despite painkillers, this area may hurt, and the cat tends to tear the threads and lick the wound. This should not be allowed to happen, since licking the wound is fraught with infection and the development of purulent and septic complications.
- After castration or sterilization. In this case, a bandage may be applied, which the cat will try to remove. In order to prevent the bandage from tearing off, you need to use a veterinary cap.
- If flea dermatitis is being treated. In this case, the cat may scratch the wounds behind the ears, in the head area, which is fraught with the addition of bacterial flora. Wearing a collar should be combined with taking antihistamines.
- If a medicated ointment is applied to an area of skin, regardless of the reason for its use. The cat will lick the medicine, which can lead to poisoning. To prevent this from happening, you need to put a cap on the animal; the duration of wearing in this case is much shorter (while the drug is absorbed).
- If powder or drops are applied to the fur against ticks and fleas.
Making an Elizabethan collar for cats with your own hands
If you don’t have the opportunity to visit a pet store, and you need a protective cone yesterday, make it yourself. This does not require special talent, so anyone can cope with the task. You just need to follow the instructions, which explain in detail how to make a collar for cats with your own hands from cardboard, a plastic bottle and other materials that are at hand.
Made from cardboard - disposable
A disposable collar is suitable for the anti-flea procedure - to prevent the cat from scratching or licking the product. It is also useful for one-time manipulations. The maximum period for wearing a cardboard accessory is 3 days.
What you will need for production:
- 2 sheets of A4 cardboard;
- ruler;
- a compass or round object - for example, a jar lid;
- marker, pencil or pen;
- scotch;
- scissors.
The whole job will take no more than 5 minutes.
Step 1.
Prepare all the tools. Find the middle on the long side of the cardboard sheet.
Step 2.
Starting from the found middle, draw a semicircle using a lid or compass. The radius for a medium-sized cat will be 6 cm, but after trying on everything will be adjusted.
Step back about 10 cm from the inner semicircle and draw an outer semicircle.
Step 3.
Cut out the workpiece - it turns out to be ½ circle. Now, placing it on the second sheet of cardboard, outline and cut out ¼ of a circle.
Step 4.
Connect the cut with tape. You should have ¾ of a circle - that is, a full collar.
Step 5.
Try the collar on the animal. If it’s too tight, move it a little away from the inner radius. Do not start with large numbers - often it is enough to step back from the edge by 0.5 cm.
Step 6.
Place the accessory on the animal and secure with tape.
Made from plastic - reusable
You can make a plastic protective product in exactly the same way. Plastic can be purchased at any office supply store. This collar is enough for several times of use, and even the most dexterous cat will not tear or remove it.
The only downside is that you can’t secure it with tape, so you’ll have to make holes and lacing (see below, in the section with the bottle).
From a bottle - in a hurry
A collar made from a five-liter bottle is used many times and is in no way inferior to a store-bought one. In addition, it is very durable - the cat will not be able to damage it and remove it. It will take 5-10 minutes to make.
What materials will you need:
- five-liter clean and dry bottle;
- marker - such that it does not rub off from the plastic;
- scissors;
- scotch;
- awl;
- ribbon or lace.
The operating procedure is as follows:
Step 1
Cut off the top of the bottle, leaving about 2 cm from the neck.
Step 2
Make a vertical cut. This will make it easier to cut off the bottom of the bottle later.
Step 3
Where the expansion of the bottle ends, cut off the bottom.
Step 4
Cover the inner side (the one that will be in contact with the cat’s neck) with tape so that the sharp edge does not injure him.
Step 5
Also, for safety reasons, round the corners on the outer edge where the cut goes.
Step 6
Make holes for the lace along both edges of the vertical cut. The optimal distance between them is 2-3 cm.
Step 7
Thread the ribbon or string through.
Step 8
Lace everything up well. Then loosen the lacing a little, put the collar on the cat and tighten the tape. Lacing directly on an animal is a disastrous idea.
From fabric
It is made on the basis of a pattern for a plastic cone, but requires fixing the shape. You will need to make a special cardboard frame or plastic insert to give the finished product stability. At the very end, cover the structure with linen or cotton fabric. You can make the protection softer by quilting the collar - using padding polyester or special materials.
This option puts virtually no strain on the neck, so cats quickly get used to it. If you don’t know how to sew, contact a craftsman you know or the nearest studio and ask to make a custom-made accessory.
Conclusion
A cat collar is a reliable means of protection that can be useful in many situations. When purchasing, consider safety and convenience, since aesthetic appearance is not at all important for the animal. But if your soul persistently demands beauty, make sure that the chosen option does not cause negative emotions in your pet, since it will be he who will wear it.
The article is a recommendation!
Wearing a collar after castration
Many owners are interested in the question of how long to wear a collar after castration. The protection is not removed until the stitches are removed (that is, within 10-12 days). In this case, the barrier must be on the dog for 24 hours without interruption. Many owners are misled into thinking that dog saliva has medicinal properties. After such contact, the seams begin to fester and fall apart. As a result, the rehabilitation period is delayed several times and the need for antibacterial therapy arises. You will also have to treat the problem area with medical means.
After 10-12 days from the date of the operation, the doctor removes the threads and assesses the animal’s condition. If the stitch has not healed sufficiently, wearing the dog collar will have to be extended for a few more days. An additional day will be needed for the thread marks to heal completely.
On a note! If the stitch was cosmetic, then wearing a dog collar after surgery is necessary for 7-10 days.
If a second appointment with the doctor is not planned, the moment to remove the collar is determined by the owner. You can remove the protection as soon as pink skin appears at the seam site. The problem area should be dry and clean, with signs of fresh growth.
A protective collar for a dog helps the animal to safely survive the rehabilitation period after surgery, as well as protect the pet from possible drug poisoning.
How to make a leash for a cat from rubber bands
Preparing the cat for walks - making a harness
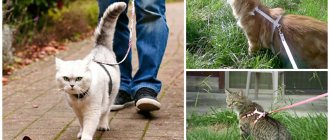
If you live in an apartment, keeping pets becomes much more difficult. It’s a little easier with dogs, put on a leash and take them outside. But for cats, a slightly different design is needed that will not embarrass freedom-loving animals, and this will be a harness for a cat. What is it and how can you use it? We invite our readers to figure it out.
We invite you to carefully examine this cat leash and understand its sewing principle. A cat harness is a cat collar that consists not of one rim, like in dogs, but of two. One ring is on the animal's neck, the second is in the middle of the chest. From above, to the bar connecting the two rings, the leash itself is attached.
Leashes are made from different materials and have different designs, but the principle of two rings is present everywhere. Some craftswomen make real masterpieces with their own hands. Here you can see a vest that covers part of the back and chest; some people make dresses for cats. The principle is the same as that of a vest, only a full skirt is attached or sewn to its bottom. You can even see the trim with beads and rhinestones.
Therefore, making a harness for your kitten with your own hands and at home is simple and fun. Plus, with the help of a vest, the animal will remain clean during the dirty season, because it is easier to wash a thing than a woolen friend.
First, let's look at the simplest leash for cats and figure out how you can make it yourself. It is very easy to put on, since the collars themselves are not solid, but are attached with Velcro and carabiners.
First you need to decide what material you can use to make a collar for a kitten. These can be leather or nylon straps, medium-diameter rope, fabric strips, especially denim. Further materials and tools
Source
Price examples
- Opaque black plastic cone with a clasp - 149 rubles .
- Transparent plastic with Velcro – 228.
- Transparent plastic cone with a soft Velcro edging – RUB 136 .
- Soft, made of non-woven material, with a thick cord threaded through the lower part of the neck, secured to the neck – 155.
- Elizabethan soft collar with nylon collar – 210 rubles .
- Soft made of thick nylon on synthetic padding with a collar and reflective elements - 240.
- Elastic silicone, transparent in the upper part, the lower part is decorated with drawings, with a polyester collar, made in Denmark - 300 rubles .
- Inflatable rubber reusable collar in the shape of a lifebuoy – 850 rubles .
With your own hands
It is not always possible to quickly select a ready-made medical collar of the required size and dimensions. In addition, it is possible that a protective accessory is needed urgently, but there is no time to search and purchase. There is only one way out - to make an E-collar with your own hands.
We will look at the most popular models of homemade collars and tell you how to make them at home.
The most popular materials for this barrier protection product are:
- cardboard;
- lightweight plastic;
- plastic bottle;
- textile.
Cardboard
The simplest and easiest way to make a collar for a cat.
A cardboard structure can be built in a hurry when an animal urgently needs protective equipment. The model is not suitable for long-term use, but it can cope with its task within a few hours. In the future, industrial designs or collars made of other materials should be used: plastic, soft fabric.
To make your own cardboard collar you will need: cardboard, tape and lace.
How to make a cardboard collar:
- Take thick cardboard. Boxes from household appliances or shoes will do.
- Take measurements from the cat - neck circumference (measurement No. 1) and neck length from the collar to the tip of the nose (measurement No. 2).
- Draw a cone on the cardboard with the length of the inner circle equal to the circumference of the neck (+2.5 cm). The width of the product will be equal to the second measurement (+2.5 cm).
- Cut out the collar according to the drawn pattern.
- The edges of the cone must be treated with tape.
- Using a lace, fasten the parts of the cone.
- For ease of wearing, make loops for the collar.
You can use a stapler, sticky tape or tape to secure the edges of the cone.
Video
Made from lightweight plastic
A more solid and reliable design is made from lightweight plastic. Such a collar is not inferior in its characteristics to finished plastic products.
To make a plastic collar you will need: a stationery folder or a flexible cutting board, tape or wide adhesive tape, a stapler and a textile fastener (Velcro).
How to make a collar from lightweight plastic:
- The pattern for the product is made in the same way as for a cardboard model.
- A cone is cut out from a stationery folder or cutting board according to the pattern, adding 2-3 cm along the edges to adjust the size.
- Sharp edges are treated with adhesive tape or tape.
- The textile fastener is attached to the plastic edges of the cone using a stapler.
To make it easier to fix the product on your cat, you can improve the design by cutting or constructing loops for the collar.
Video
From a plastic bottle
Models of Elizabethan bottle collars are popular among cat owners - this material is found in every home. Bottle plastic is transparent, flexible and durable - collars made from them will last a long time.
For a plastic bottle collar you will need: a water bottle, tape, adhesive tape or string.
How to make a collar from a plastic bottle:
- Choose a transparent bottle of the appropriate size.
- On the side of the neck, a marker marks a diameter equal to the circumference of the pet’s neck.
- The neck is cut off and the length of the cat’s head is measured (measurement No. 2).
- The rest of the bottle is cut along the marked line.
- So that the product can be put on a cat, the cone is cut lengthwise.
- The lacing is threaded along the cutting line into pre-made holes or a Velcro fastener is attached using a stapler.
To prevent the animal from injuring itself, all sharp cuts are sealed with adhesive tape or tape.
Soft fabric collar
Not all cats will like hard plastic and cardboard structures. Capricious pets will like soft fabric products more. The collar is sewn from cotton fabric to minimize possible allergic reactions. Linen or cotton is best suited for this purpose.
To create a more dense structure, a cardboard or plastic base is placed between strips of fabric, and the collar is stuffed with padding polyester or cotton wool.
The simplest collar can be sewn using the pattern that was used for the cardboard and plastic versions. Don't forget to add 1.5 cm at the seams. Along the cut line, the edges of the collar are secured with adhesive tape.
Collar made from scrap materials
An interesting video about how to quickly make an Elizabethan collar from disposable paper plates.
Dependence of price on material
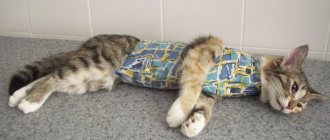
And maximum comfort will be provided to your pet by the so-called Elizabethan or lifebuoy-shaped models made of non-woven materials or soft fabrics with padding made of padding polyester and an upper part with water-repellent impregnation. They are equipped with their own collars or the size is adjusted by tightening the thick cord.
And finally, the most expensive - inflatable rubber rings . They are reusable and can serve more than one generation of cats. Ideally comfortable while sleeping and when wearing them for a long time.
The simplest models are inexpensive compared to more complicated ones , consisting of several parts and layers, universal in size with the ability to be adjusted directly when put on the cat.
Instructions for use
It’s not enough to just buy a collar for cats and put it on, you need to remember that the animal is wearing a hindrance, and he will have to help him live with it. To begin with, the collar must be removed at each feeding - the cat simply cannot reach the food in it. You will have to do the same when your pet wants to drink, so you need to constantly monitor her.
If injections are given in the cat's scruff, you need to put on the collar so that its clasp (the roughest part) does not fall on this place.
- Choose a post-operative collar for your cat exactly according to the size of the animal. It should not fall off or be too tight.
- Do not use models that are too heavy or bulky - they excessively restrict the cat’s movements and interfere with visibility.
- Do not opt for the cheapest models - they may be made from toxic materials.
- If the structure has sharp edges, they must be treated with adhesive tape or tape.
- Special “children’s” models are selected for kittens; it is unacceptable to use a collar “for growth.”
- When a cat is wearing a protective cone, it should not be allowed outside - it is not safe.
- When using the collar, you need to organize the cat's eating area so that she can reach bowls of food and water.
- If a cat refuses to eat while wearing a collar, it should be fed by hand or without a collar, but under the supervision of the owner.
- The structure is not removed until the wound has completely healed or until the veterinarian gives permission.
- During use, it is necessary to check the skin under the collar to prevent chafing.
- The collar prevents the cat from grooming itself - do not forget to brush the animal daily.
- The collar makes it difficult for the animal to move; prepare the living space in advance. Make sure your cat doesn't accidentally get stuck in narrow passages.
We suggest you read: Description of cats with big ears
Reviews
I encountered the need to use a protective collar six times—that’s exactly how many cats came into my house. Not a single animal escaped sterilization or castration; abdominal surgery also had to be performed. Veterinarians recommended the use of barrier therapy. We bought plastic collars at a veterinary pharmacy.
They drove each of our pets into a frenzy. The cats tirelessly attempted to get rid of the foreign object and refused to drink or eat. We gave up and put on a blanket that did not cause any negative reaction in our furbabies. Of course, she did not prevent the animals from licking their wounds, so she had to carefully monitor them, constantly being at home.
The protective collar is an important element of barrier therapy. But it can be both uncomfortable and scary for a cat. Do not leave the animal unattended during the rehabilitation period so that the pet does not remove the collar and cause injury to itself. If your cat refuses to eat or drink water while wearing a collar, try to remove the protective device from it for a while and offer treats and liquids. A proper diet for recovery is no less necessary than treatment.
Making a protective product for a pet
You can make a collar for your pet yourself. There are several different ways to make it, depending on the materials chosen.
If you don’t have time to purchase a collar, but you need it urgently, you can build it in a short time from what you have at hand. You will need:
- thick cardboard;
- tape measure;
- compass;
- stapler;
- scissors;
- scotch.
We suggest you read: What to feed a British kitten: rules of feeding and care
The procedure is as follows:
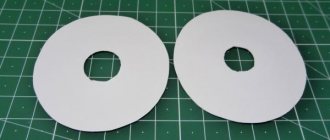
- On a sheet of cardboard we draw a semicircle (diameter - 20–25 centimeters).
- Cut out the part and roll it into a funnel.
- Using a measuring tape, we find out the circumference of the pet’s neck.
- At the base of the cone we make a hole, the diameter of which is equal to the circumference of the cat’s neck.
- After you wrap the future collar around the cat’s neck, its side sections will need to be secured with a stapler or tape.
Problems when wearing a postoperative collar:
- A collar that is too large or heavy for a cat will greatly impair coordination: it will be difficult and even impossible for him to jump anywhere, pass between objects, eat and drink.
- An excessively tight collar will lead to hypoxia - oxygen starvation of the brain, poor circulation, chafing of the skin at the point of contact, and damage to the coat.
- An animal can remove an excessively loose collar, or it will slip lower and complicate movement.
- It is unacceptable to buy collars with a strong “chemical” smell. These products are of low quality and your cat may be poisoned by wearing them.
- Buying a collar for a kitten to grow into is not the best solution. A young animal will feel uncomfortable in a bulky structure designed for an adult. A collar is not such an expensive thing to buy for future use. It is better to select it individually each time than to squeeze a large cat into a small collar or try to attach a device purchased for an older cat to a “teenager”.
- The sharp edge of the collar at the point of contact with the cat’s body should be covered with an adhesive plaster on a fabric basis.
- The collar must be removed periodically to allow the animal to run freely and restore muscle tone. It would be good to put a blanket on a cat after abdominal surgery. The animal must not be left unattended while the collar is removed.
- A protective collar for cats is necessary for various types of medical interventions. It preserves the health of the animal, being a necessary measure in the postoperative period and during conservative treatment with drugs for external use. The cat quickly gets used to the inconvenience of wearing it. In addition, a properly selected protective collar almost does not cause them.
DIY Elizabethan cat collar made from a plastic bottle
Factory-made protective collars for animals are quite complex structures, attached to the collar with special straps, with a large number of latches and Velcro fasteners. Or you can do this simple option:
It seems that in order to prevent the ointment from being licked off for half an hour, while the medicine is absorbed into the skin, all these sophisticated devices are not needed.
Note. Why do cats aggressively resist the application of ointments and lick the medicine from the affected areas?
In fact, the problem is not in the spreading process itself, but in the strong unpleasant odors caused by the ingredients of the ointments. Tar, sulfur and other strong-smelling medications lead animals into an excited, even aggressive state, and not at all the process of gentle stroking.
To calm your pet, before the procedure you can give the cat a few drops of valerian, which, by the way, will somewhat eliminate the untidy smell of tar.
The Elizabethan collar sold in stores is equipped with many latches and fasteners, much like various types of carbines and swivels in military ammunition.
To cope with all these complex devices requires a fair amount of skill and practice.
We offer a simple option on how to make a collar from a plastic bottle, made in a few minutes, which is put on and fixed with one hand (while with the other three you hold the desperately tearing, scratching and biting animal, which suddenly turns out to be surprisingly strong and nimble).
- Cut a thick plastic bottle (sheet plastic, about a millimeter or two thick, is even better). Ideally, from a piece of soft fluoroplastic that does not form sharp edges and cannot damage the pet’s skin.
- Put together a pattern that will roll into a cone-shaped shape with a slight overlap.
Pieces of Velcro are glued to the edges of the funnel with super glue, which will act as an instant fastener. The edges of the plastic may be sharp. To avoid damaging your pet's neck, cover the sharp cut edge of the collar with electrical tape.
- first option;
- second option;
- third option;
- all options.
DIY Elizabethan cat collar made from cardboard
A homemade protective collar made of cardboard is made similarly to the method described above.
The only difference is in the method of attaching the Velcro fastener - an adhesive connection here will not provide sufficient strength. It is better to sew Velcro to the edges of the cardboard collar using harsh threads.
Opinion. The option of securing an Elizabethan collar made of cardboard with tape sounds rather dubious from the point of view of manufacturability. Where can I get at least one more hand to operate with a roll of tape? And tape, according to Murphy's Law, in such situations always ends up with a lost end.
The cardboard protective collar is disposable, as it is severely damaged and dirty when used, and cannot be washed or cleaned. But the task of tearing the hated box collar to shreds will help distract the cat for the minutes necessary to absorb the ointment.
Advice. Before starting treatment and prophylactic procedures with cats, prepare first aid supplies - hydrogen peroxide, iodine, bandages. This is not for the cat, but to heal the owner’s wounds received in an unequal struggle with the pet.
Video on how to quickly make a protective collar for a cat from cardboard:
Video on how to quickly make an Elizabethan collar for a cat from plastic:
Installer of buttons on AliExpress.
Making a postoperative cap with your own hands
You can choose a collar to suit every taste, but if it is needed urgently, and the owner cannot immediately purchase the device, it is made with his own hands.
Regardless of the material chosen, the main thing in its manufacture is convenience and safety for the pet, so you need to carefully follow the instructions and correctly take measurements from the cat. How to make a collar at home?
Rigid plastic bottle design
This is the most practical product that can be used throughout the entire treatment period. To make a collar from a plastic bottle, you need:
- choose a bottle of the appropriate size - for adult cats, for example, a 1.5 liter container is suitable, and for kittens - 0.5 liter;
- take standard measurements - neck circumference (1) and length from the collar to the tip of the nose (2) - the height of the future product;
- mark and cut the bottle along these marks - you will get a truncated cone;
- cut the product along the length, thread a lace into it or attach a Velcro fastener to it using a stapler;
- cover sharp edges with tape;
- attach loops for a collar or bandage to the edge adjacent to the neck.
Soft stopper made of thick fabric or foam rubber
It is recommended to sew soft collars from natural fabrics so as not to provoke an allergic reaction in your pet. Instructions for sewing a soft collar:
Cat Collar Pattern
- take 2 standard measurements and, based on them, make a pattern so that you get a stencil with a margin of 2.5–3 cm in the shape of the letter “C”, where the size of the inner semicircle is equal to the circumference of the neck, and the outer one is the length of the neck to the tip of the nose;
- cut out 2 fabric parts and a layer, best from thick felt or several layers of drape stitched together;
- sew the cover along the outer edge, insert the filling into it and stitch it along the inner edge and the cutting line;
- iron the collar, attach a cord or Velcro to the cutting line, and loops to the edge adjacent to the neck.
You can also make a collar from foam rubber. For this, material 4–5 cm thick is used. In this case, there is no need to cut the covers and iron the collar. It is enough to cut the foam rubber according to the same pattern as the soft collar, and trim the edges with piping or bias tape so as not to injure the pet. Next, a lace is threaded into the cutting line, and loops for the collar are sewn to the bottom edge. A product made of foam rubber loses its shape even faster than a fabric one, so it is better to give preference to a plastic collar.
Temporary cardboard product
A cardboard cone is a temporary replacement for a thick funnel when you urgently need to treat your pet’s fur with an antiparasitic agent and there is no way to get it to a veterinary pharmacy. This product quickly loses its shape and lasts only a few hours, after which it needs to be replaced with a dense model. The procedure for making a collar:
- taking measurements and applying a template to cardboard - to create a stencil, as when sewing a fabric collar;
- cut the product according to the diagram and roll it into a cone, but do not fasten it - it still needs to be “adjusted”;
- cover the edges with tape or adhesive tape;
- insert a cord along the cutting line, and along the edge adjacent to the neck - loops for the collar;
- assemble the product, but not too tightly so that the head can pass through it, and secure it around the pet’s neck.
What to look for when choosing
When buying a protective collar, focus on its size, length, and the material from which it is made.
Manufacturers, as a rule, produce collars made of plastic. This is the most inexpensive model. A reinforced collar can cost a little more - it is trimmed along the edge with an elastic band that protects the structure from breakage. A plastic collar in the shape of a semicircle is wrapped around the cat’s neck and fastened with “tabs” that are pushed through the holes on the opposite edge. Its advantage is that, thanks to the transparency of the plastic, the cat retains its usual view.
If you purchased a plastic collar without elastic around the outer edge, you can reinforce it yourself. To do this, cover the edges of the collar with a regular adhesive plaster. This will protect the upper part from the consequences of collisions with external objects and make the lower part (adjacent to the cat’s neck) softer.
If you want your sick pet to feel more comfortable, and you plan to wear the “protection” for a long time, then you can look for a collar made of soft fabric or non-woven water-repellent material. The shape of such products is a cone or a lifebuoy. The latter option is reminiscent of the pillows that passengers use for comfortable sleep on long journeys. This model is made from padding polyester, cotton or polyester and water-repellent impregnation.
It is not difficult to put such a collar on an animal, because it is attached with Velcro fasteners to a regular collar or has convenient fasteners. This collar does not have to be unfastened every time to feed your pet, because you can eat food, drink water and move actively in it. It can also be washed if it gets dirty with medicine or food.
A cone-shaped collar made of non-woven water-repellent materials causes less discomfort than a plastic product. The most comfortable collar for a cat is like a lifebuoy. You can buy a plastic collar inexpensively or make it yourself. READ Raising offspring of elephant seals
The size of the collar should correspond to the circumference of the cat's neck with an allowance for freedom of fit (you can stick a finger between the neck and the collar). A narrow collar will cause additional discomfort to a sick animal, while a collar that is too wide may slip off the neck.
The width of the protective field (length of the product) must be sufficient to protect the cat from harming itself. It is approximately equal to the height of the cat's head with a slight increase. If these parameters do not meet, the collar will either not perform its protective function or will interfere with the animal’s movement around the house.
Factory collars have a unique division into sizes, in which the numbers correspond to the scale of the protective field:
- No. 7 (7.5 cm);
- No. 10 (10.5 cm);
- No. 12 (12 cm);
- No. 15 (15 cm);
- No. 20 (21.5 cm);
- No. 25 (25 cm).
Thus, for small kittens, size No. 7 is often chosen, and for adult kittens, sizes No. 10 and 12 are often chosen.